Downloads
Executable for the map editor (Windows 32bits)
Executable for the game - exactly the same as in part 7 (Windows 32bits)
Before you try to compile the code go to the "Projects" tab on the left menu, select the "Run" settings for your kit,
and set the "Working directory" to the path of "editor\data" for the editor or "game\data" for the game.
Bugs fixed
I moved most of these informations in the toolSelect() function of "editor.cpp" to prevent some strange behaviors.
You can now copy or cut a single wall to paste it later. I won't explain this in details because it is not the most interesting
part of the editor. But for those interested, I added a mType and a mSide in the clipboard class.
Most of the clipboard and the copy/cut/paste tools have been rewritten to take this type into account.
I also made some changes to the drawing of the selection rectangle. Now it is drawn after the cursor, so that you can see the
difference when you paste a single tile or wall.
The tiles and the walls lists
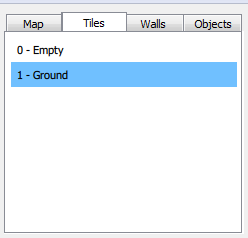
These are simple QML "ListViews" that use the same strings list that we used for the ComboBoxes last time.
Let's see what it looks like for the tiles in "TilesTab.qml":
		ScrollView
		{
			x: 6
			y: 6
			width: parent.width - 12
			height: parent.height - 12

			ListView
			{
				model:tilesList
				currentIndex: bridge.tileType

				delegate: Item {
					width: parent.width - 12
					height: 25

					Text {
						x: 6
						width: parent.width - 12
						anchors.verticalCenter: parent.verticalCenter
						text: modelData
					}

					MouseArea {
						anchors.fill: parent
						onClicked: bridge.tileType = index
					}
				}

				highlight: Rectangle { color: "#70c0ff" }
			}
		}
Then we see the ListView itself. it uses the tiles' name list that we defined in the last part as a "model" that is to say
it's the data that will be used in each line of the list.
The current selected line is binded to the bridge.tileType variable, which is a shared variable between the QML and the C++ parts.
The "delegate" defines the graphical representation of each line. It is only an invisible "Item" that contains a centered text.
By default in QML the listviews are only controlled with the keyboard. So we have to add a "MouseArea" in the delegate to catch.
the mouse clicks on this line.
In the last part, we called a function of "bridge.cpp" when the value of a ComboBox changed, because we had some code to execute
in the C++ part. Here, we don't really need to do something every time we select a tile type. So we only update our bridge.tileType
variable that will automatically update the "currentIndex" of the listView - that's the strength of the binding in QML.
Finally the "highlight" defines what we want to draw in the background of the currently selected line - the one that is defined
by currentIndex. Here we only draw a blue rectangle of the same size as the invisible Item of the delegate.
Later, in the draw tool, we only have to get the value of "bridge.tileType" on the C++ side to draw the right type of tile.
The databases
and it would be a bad idea to store all these datas as tables inside the code.
So we will store them in an file that the editor will read when it is started.
It will also be more flexible if we want to use the editor for another game.
I choosed to store them in xml as it is a common format, easy to modify with a text editor, and because Qt already has functions
to read this format.
You will find these files in "editor/data/databases". So let's see what "tiles.xml" looks like:
		<?xml version="1.0" encoding="ISO-8859-1"?>
		<tiles>
			<tile name="Empty">
			</tile>

			<tile name="Ground">
				<image>Tile.png</image>
			</tile>
		</tiles>
that will be used to draw this tile in the editor.
These files are read by the readTilesDB() and readWallsDB() functions at the end of "editor.cpp".
I used deprecated functions to write them, but they still work - at least with Qt 5.6 - and they are easier to understand than their
replacements.
		void    CEditor::readTilesDB()
		{
			QDomDocument doc;

			QFile f("databases/tiles.xml");
			f.open(QIODevice::ReadOnly);
			doc.setContent(&f);
			f.close();

			QDomElement root = doc.documentElement();
			QDomElement tile = root.firstChild().toElement();

			while(!tile.isNull())
			{
				if (tile.tagName() == "tile")
				{
					CTileData   newTile;

					newTile.name = tile.attribute("name");

					QDomElement tileInfo = tile.firstChild().toElement();

					while(!tileInfo.isNull())
					{
						if (tileInfo.tagName() == "image")
							newTile.image = QString("tiles/") + tileInfo.text();

						tileInfo = tileInfo.nextSibling().toElement();
					}
					tilesDatas.push_back(newTile);
				}
				tile = tile.nextSibling().toElement();
			}
		}
Then I simply changed the displayMap() function to used the file names from these xml files. And while I was at it, I also used
the file cache that we used in the game.