Format of the maps
But how do we represent a wall ?
There are two main ways to see walls.
-
The "thick" walls representation, or tile-based map.
You can see the map as a kind of crosswords grid with empty and filled squares.
To know if we can move from one tile to another, we only have to test if the destination tile is filled.
But we also need to have additional informations about the walls, if for example a switch is on one side of a tile. -
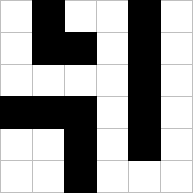
The "thin" walls representation, or wall-based map.
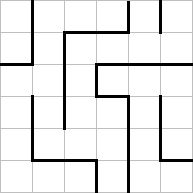
We focus more on the walls separating the tiles than on the tiles itselves.
With this representation we also need informations about the tiles, as in the game there are some elements that sits
in the middle of a tile like teleporters, or holes in the ground.
But this way of seeing the map is more flexible as it allows us to represent a tile based map too.
We also need to ask ourselves if the walls are the same both side. Or if we can have i.e. a button on one side and a lever on the opposite side
We see walls. We don't know when we see a wall if the tile behind is filled with something or empty.
And as I think that the map editor could be used for others game I opted for the most flexible format, even if it's the more expensive in terms of memory size.
Each tile will contain a byte representing it's type, saying if it's an empty tile, a tile with a hole in the ground, a teleporter, etc..
Each tile will also contain 4 "wall" elements representing the "inner" side of each wall - the side that we see when we are inside of the tile.
Obviously the outer side of each wall is the inner side of the corresponding wall of the tile next to us.
Each of these "wall" elements will contain a byte that will tell it's type - either if it's a plain wall, a wall with a switch, a wall with an alcove, etc...
The map will be wall-based. So if we want to move from one tile to another we will test the walls between them. In fact we will only test the "inner" walls of the starting tile.
The editor
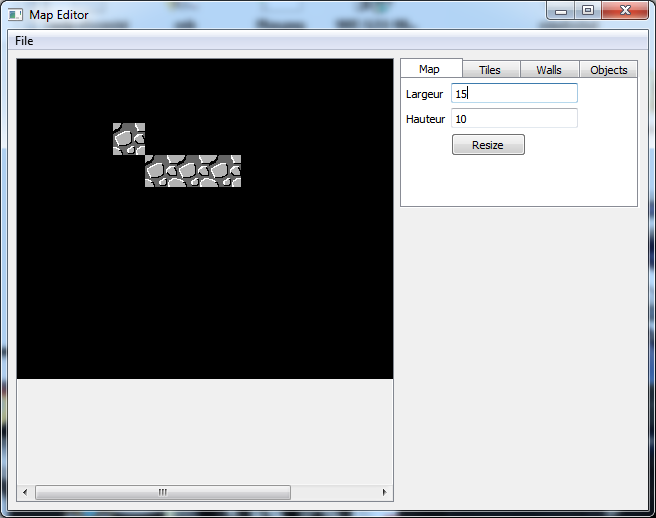
This is the first version of the map editor.
On the left there is obviously the map. If you resize the window you'll see that this area will strecth to fill the space available.
As you can see on the image, if this area is to small to contain the map, a scrollbar will appear to allow us to move into the map.
This way we can work on map of any size.
On the right, is the "tools" area. At the moment there is only a "tabview" that will allow us to work at different levels on the map.
- In the Map tab we will set datas that only appears once in the whole map. At the moment you can use it to change the size of the map.
- In the Tiles tab there will be a list to select the type of tile we want to set on the map
- In the same spirit, in the Walls tab there will be a list of wall types
- The Object tab will be used to place objects on the ground
Let's use it
Press the left mouse button and the tile will change to a beautiful hand drawn "stone pattern".
Press the right mouse button and the tile will turn black again.
Note: If you compiled yourself the sources and you see that nothing changes when you click on the left mouse button, check the path to "Tile.png" in Map.cpp
Now "draw" a few tiles like that, and click on the "Walls" tab.
If you move your mouse on the map you will see that the green square is now a rectangle that represents the walls.
There is no way to draw a wall at the moment.
If you click on the "Objects" tab, you will see that the green square is smaller. Because in the original game there are 4 possible positions to place an object inside a tile
The code
- MapEditor.pro is the Qt project file to open with Qt Creator. It lists all the ".h" and ".cpp files.
- qml.qrc is also part of the project informations that Qt uses. It lists all the qml files.
- MainForm.ui.qml the main file describing the interface.
- main.qml a file that contains the actions we will execute when we press a button or change a value in the interface,
as to follow the rules of Qt we can't call functions in ".ui" files. You will see that we mostly call functions of Bridge.cpp here. - MapTab.qml the file that describes the "Map" tab in the tabview.
- main.cpp the main entry point of our program. Here we register the functions of Bridge.cpp so that we can use them in the qml files.
- Bridge.h & Bridge.cpp contains functions to communicate between the qml and the c++ parts. We mostly recieve datas from the interface and store them here.
It also contains the "image provider". As the image of the map is not refreshed automatically, when we change it, we call updateQMLImage() that signals the qml part.
The qml in turn calls the image provider that redraws the image. - cmaths.h & cmaths.cpp some mathematic functions. As we will use a lot of 2D coordinates, it mostly contains a 2D vector class - CVec2 - and functions to do
all sorts of calculations on it. - cgraphics2d.h & cgraphics2d.cpp basic graphics routines to draw lines, rectangle and copy images like our tiles in the big image of the map.
- Map.h & Map.cpp contains the representation of the map as we discussed it above and a few functions to manipulate it.
Amongst other things the function "display" that draws it on the screen.