Downloads
Executable for the map editor - exactly the same as in part 5 (Windows 32bits)
Executable for the game (Windows 32bits)
Before you try to compile the code go to the "Projects" tab on the left menu, select the "Run" settings for your kit,
and set the "Working directory" to the path of "editor\data" for the editor or "game\data" for the game.
Adapting the graphics - from tiles to walls
Now, we choosed to use a wall-based representation, so to simplify our work we will separate the graphics of facing and side walls.
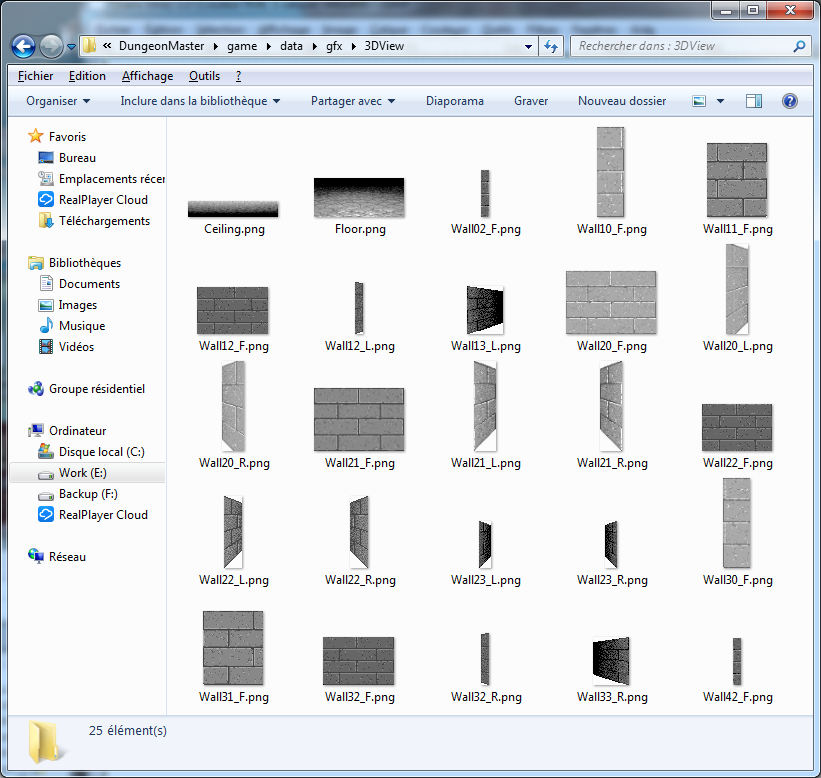
I will explain later the naming conventions I used for those files.
You can find all these walls at their right place in the Gimp file "wall_pos.xcf"
And from the outside...
Only 3 types of walls appeared in the graphics: left walls, right walls and front walls - the wall of the tile that is the nearest ot us.
So potentially, every tile could have 3 walls drawn:
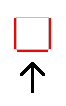
The arrow shows the direction we are looking at. Note: to simplify, in most of this article we will consider that we are facing north - top of the map -
so the tiles we see are "above us" in the map.
You can see that the "back" side of the tile - the farthest from us - is never drawn.
In fact, when you look at the graphics files, no tile has 3 of it's walls drawn. Here are all the walls we can see with the approximate cone of vision:
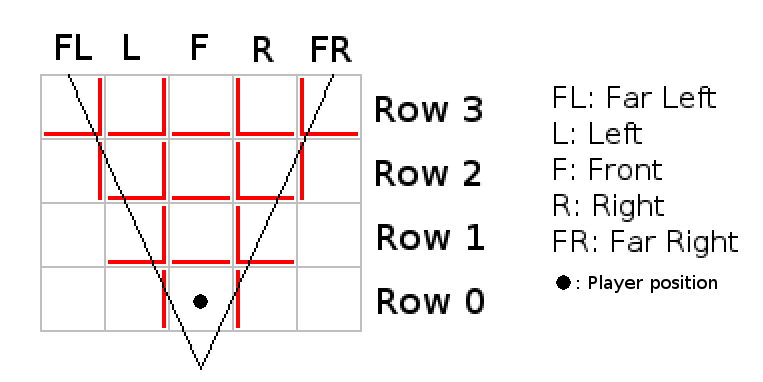
So how to tell which walls we have to draw for each tile ?
We can answer this by using the backface culling method: "We draw only walls that are oriented towards us".
Or we can think in terms or ray-casting, which is a little more simpler to understand I think.
Imagine that you cast a ray towards a wall, starting at the player's position.
If the ray hits the outer side of the wall before it's inner side, we will draw that wall.
... to the inside
So, is it possible to achieve the same drawing using inner walls instead of outer ones ?
Let's try to use the same algorithm: we cast rays from the player's position, but we only draw a wall when the ray hits it's inner side before it's outer side.
There are all the walls that we will draw:
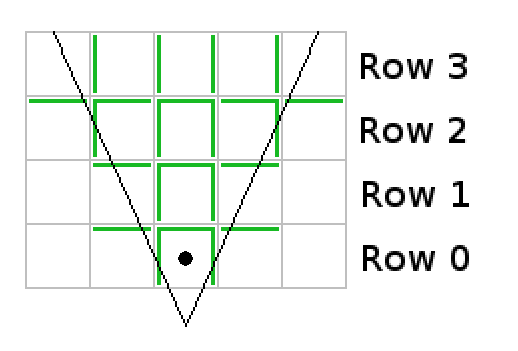
If we label the tiles in this image, you will understand how I named the files:

The file names have this form: Wall<xx>_<y>.png where <xx> is the number of the tile as above, and <y> is a letter giving the side of the wall inside the tile
- "L" for left, "R" for right, "F" for facing.
Comparing the two ways of drawing
Each red wall has a correponding green wall.
And that's a good thing because I don't have the skills to draw new wall graphics...
But are they really equivalent? When we draw the walls of the green diagram don't we get strange overlapping walls like we saw in part 4?
In fact if we follow the order we defined before it works, that's to say:
- Draw the leftmost/rightmost tiles of a row first, then the center ones
- Draw the farthest row first then the nearest ones
But there is also another important thing to take into account. In the game there is not only walls. There are also objects laying on the ground
and monsters that crawls between these walls. Will they fit into our way of drawing walls?
In fact, we only will to follow one simple rule for this to work: on a given tile, we need to draw the walls first, then the objects or monsters
that are in this tile. As the walls we draw are the "inner" walls of the tile, they will always appear behind the monsters.
You can also try this in Gimp.
Implementation
In the sources of this part for the game project, in "main.cpp", you will see that we start by loading the map - as we saw in the previous part:
map.load((char *)"maps/test.map");
- walls.h & walls.cpp: where we will find the functions to draw the walls in the way we just explained
- player.h & player.cpp: which hold the position where we are in the map and the direction we are looking at.
In this part we won't be able to move in the map, but these informations are needed to draw the walls.
The table
		static const CDispTile   gDispTiles[WALL_TABLE_HEIGHT][WALL_TABLE_WIDTH][3] =
		{
			// Row 3 (farthest)
			{
				{{"", 0, 0}, {"", 0, 0},               {"", 0, 0}               }, // 03
				{{"", 0, 0}, {"Wall13_L.png", 8, 58},  {"", 0, 0}               }, // 13
				{{"", 0, 0}, {"Wall23_L.png", 78, 59}, {"Wall23_R.png", 134, 59}}, // 23
				{{"", 0, 0}, {"", 0, 0},               {"Wall33_R.png", 180, 58}}, // 33
				{{"", 0, 0}, {"", 0, 0},               {"", 0, 0}               }  // 43
			},

			// Row 2
			{
				{{"Wall02_F.png",   0, 58}, {"", 0, 0},               {"", 0, 0}               }, // 02
				{{"Wall12_F.png",   7, 58}, {"Wall12_L.png",  0, 57}, {"", 0, 0}               }, // 12
				{{"Wall22_F.png",  77, 58}, {"Wall22_L.png", 60, 52}, {"Wall22_R.png", 146, 52}}, // 22
				{{"Wall32_F.png", 146, 58}, {"", 0, 0},               {"Wall32_R.png", 216, 57}}, // 32
				{{"Wall42_F.png", 216, 58}, {"", 0, 0},               {"", 0, 0}               }  // 42
			},

			// Row 1
			{
				{{"", 0, 0},                {"", 0, 0},               {"", 0, 0}               }, // 01
				{{"Wall11_F.png",   0, 52}, {"", 0, 0},               {"", 0, 0}               }, // 11
				{{"Wall21_F.png",  59, 52}, {"Wall21_L.png", 33, 42}, {"Wall21_R.png", 164, 42}}, // 21
				{{"Wall31_F.png", 164, 52}, {"", 0, 0},               {"", 0, 0}               }, // 31
				{{"", 0, 0},                {"", 0, 0},               {"", 0, 0}               }  // 41
			},

			// Row 0 (nearest)
			{
				{{"", 0, 0},                {"", 0, 0},              {"", 0, 0}               }, // 00
				{{"Wall10_F.png",   0, 42}, {"", 0, 0},              {"", 0, 0}               }, // 10
				{{"Wall20_F.png",  32, 42}, {"Wall20_L.png", 0, 33}, {"Wall20_R.png", 191, 33}}, // 20
				{{"Wall30_F.png", 191, 42}, {"", 0, 0},              {"", 0, 0}               }, // 30
				{{"", 0, 0},                {"", 0, 0},              {"", 0, 0}               }  // 40
			}
		};
Tiles are stored in the same order as they appear in the diagram, so beginning with tile 03, then 13, then 23, and so on...
For each tile, we find the datas of the 3 walls that can be drawn - the facing wall, the left one and the right one.
Those datas are the name of the graphics file and the coordinates at which it should appear on screen.
There are many "empty" datas because as it is shown on our diagram there are many walls that we don't see in our cone of vision
Now let's see how we use those datas to actually draw the walls.
The drawing loop
After we have drawn the floor and the ceiling, we now find this loop:
		// draw the walls
		CVec2   tablePos;
		CVec2   localPos;
		CVec2   mapPos;
		EWallSide   side;
		CTile*  tile;

		for (int y = 0; y < WALL_TABLE_HEIGHT; ++y)
			for (int x = 0; x < WALL_TABLE_WIDTH; ++x)
			{
				tablePos = walls.getDrawSequence(CVec2(x, y));
				localPos = walls.getMapPos(tablePos);
				mapPos = player.getPosFromLocal(localPos);
				tile = map.getTile(mapPos);

				if (tile != NULL)
				{
					side = player.getWallSide(eWallSideUp);
					if (tile->mWalls[side].mType != 0)
						drawWall(&image, tablePos, eWallSideUp);

					side = player.getWallSide(eWallSideLeft);
					if (tile->mWalls[side].mType != 0)
						drawWall(&image, tablePos, eWallSideLeft);

					side = player.getWallSide(eWallSideRight);
					if (tile->mWalls[side].mType != 0)
						drawWall(&image, tablePos, eWallSideRight);

					// objects.draw();
					// monsters.draw();
				}
			}
Then we call getDrawSequence() that return the right tile in table that follows the order we discussed several times:
leftmost/rightmost first, etc...
So "tablePos" holds the coordinates in the table of the tile we are about to draw.
getMapPos() converts these coordinates into map coordinates relative to the player position - the black dot in the diagram.
At this point we are still assuming that we are facing north. In example, the tile "00" in our diagram will give the coordinates (-2, 0)
Then we call the function getPosFromLocal of "player.cpp" that gives us the real map coordinates, taking into account the position
of the player and the direction he is looking at.
We get a pointer to the tile and check if we are not out of the map.
And we check the 3 walls of the tile - facing, left and right - to see if we have to draw them.
Before each test, we call the function getWallSide of player.cpp that returns the right wall we have to check according to the player orientation.
I.e. when we want to check the up wall of the tile while assuming we are facing north, then if the player is looking towards east, we will check
the right wall of this tile.
The function drawWall gets the graphics file name from the table and draws it at it's screen coordinates if it is not empty.
The last lines of the loop are placeholders showing where we will call the functions to draw the monsters and objects in the future.
If you launch this code with the supplied map you will only find yourself in a tile surrounded by walls - you are at pos (0, 0) and facing north.
As I said, you can't move in the map yet, we will handle that in the next part. But you can eventually change the player's position by hand in the code
to test if everything is displayed as it should be.