Downloads
Executable for the map editor (Windows 32bits)
The game should not work properly in this part. I'll fix it in the next part.
Before you try to compile the code go to the "Projects" tab on the left menu, select the "Run" settings for your kit,
and set the "Working directory" to the path of "editor\data" for the editor.
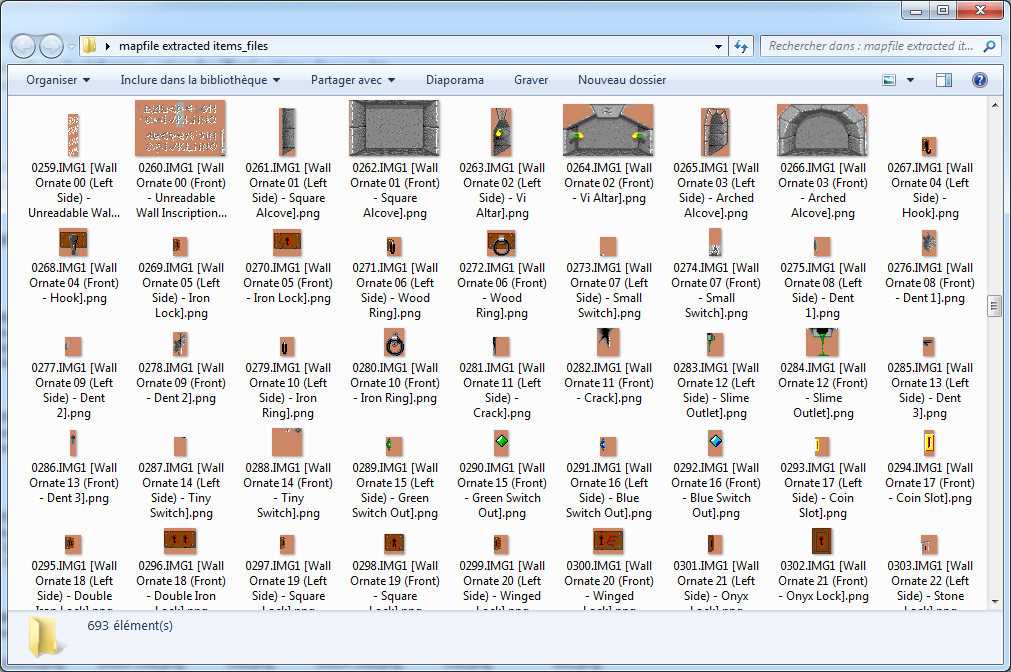
The ornates
It may be purely decoratives - moss, hooks, manacles... - but it may also be interactive elements likes switches, levers,
the champions pictures in the first level, the keyholes, the altars or the texts written on the walls.
Here is a quick look of the ornates in the original graphics.
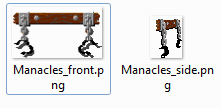
Now let's try to display a single ornate - say the manacles because they are big.
When we look at the graphics for the manacles, we see that there is only 2 sprites for them, one facing and one for the left side.
But in the game we can see them on various walls, far or near:
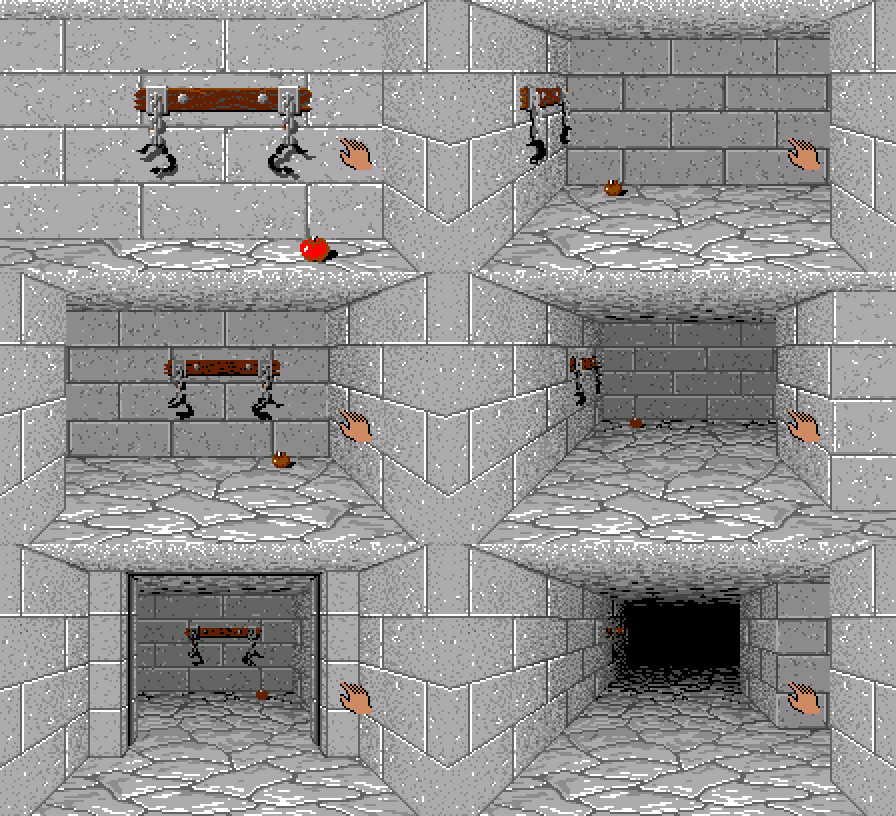
So how does it work ?
First of all, obviously, if the ornate should appear on a right wall instead of a left one, the graphics of the left was simply
flipped horizontally.
Then, as you can see the farther the wall is, the smaller the ornate appears.
Back in the days, there was few computers with zoomed sprites. So the shrinked versions of the ornates were pre-calculated at the beginning
of the game.
The graphics routines we use can stretch the graphics so we won't have to pre-calculate them. In fact if you looked at the sources when we
flipped the walls in the last part, it was done by a scale of -1 on the X-axis.
The graphics also appears darker when they are farther from us, to match the wall colors. It is clearly visible on the apple, and a bit less
noticeable on the manacles.
That's because there is another limitation to take into account. The game's graphics were palletized, so when they were pre-calculated,
the pixels could only take a few number of colors.
We won't have this limitation either, so our ornates should look nicer.
But we'll talk about the details of the rendering later. Now let's just create a database that contains the datas we will need.
We will call it "ornates.xml":
		<?xml version="1.0" encoding="ISO-8859-1"?>
		<ornates>
			<ornate name="None">
			</ornate>

			<ornate name="Manacles">
				<image_front>Manacles_front.png</image_front>
				<image_side>Manacles_side.png</image_side>
				<pos_front x="66" y="71"/>
				<pos_side x="30" y="73"/>
			</ornate>
		</ornates>
The game will read all those datas and compute the positions for the scaled images according to the walls positions.
This database will also be copied in the editor's data folder. The editor will only need the ornates names.
Note for later: I'll have to reorganize the data folders to avoid those copies...
But let's look how we will set the ornates in the editor.
Additional parameters in "walls.xml"
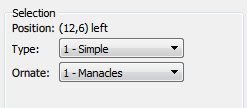
But the second ComboBox will not be set like the first one. In fact we will need to have different parameters for each type of walls.
Let's say for example that this first type will be a simple wall with only a decorative ornate.
The type 2 could be a wall with a text so we would have a string parameter.
The 3rd type would be for switches and levers, so we would have 2 ornates ComboBoxes - one for the off state and one for the on state -
and perhabs an boolean parameter to hold the state of the switch.
And so on.
For flexibility we won't hard code those types into the editor.
So we will have to create dynamically the ComboBoxes, text fields, or other buttons for these parameters.
First we will modify "walls.xml" to define our additional parameter:
		<?xml version="1.0" encoding="ISO-8859-1"?>
		<walls>
			<wall name="Nothing">
			</wall>

			<wall name="Simple">
				<image>Wall.png</image>
				<param type="ornate">Ornate</param>
			</wall>
		</walls>
		enum EParamType
		{
			eParamOrnate = 0,
		};
		struct CParamType
		{
			EParamType  mType;
			QString     mName;
		};

		class CMap
		{
			[...]
			std::vector<std::vector<CParamType>>  mWallsParams; // list of the params for each type of wall
			[...]
		};
We have to change readWallsDB() to read these parameters types and names:
		void    CEditor::readWallsDB(QString fileName)
		{
			[...]

			while(!wall.isNull())
			{
				std::vector paramsTypesList;

				if (wall.tagName() == "wall")
				{
					CWallData   newWall;

					[...]

					while(!wallInfo.isNull())
					{
						if (wallInfo.tagName() == "image")
						{
							[...]
						}
						else if (wallInfo.tagName() == "param")
						{
							QString paramType = wallInfo.attribute("type");

							if (paramType == "ornate")
							{
								CParamType  newParamType;
								newParamType.mType = eParamOrnate;
								newParamType.mName = wallInfo.text();
								paramsTypesList.push_back(newParamType);
							}
						}

						wallInfo = wallInfo.nextSibling().toElement();
					}
					wallsDatas.push_back(newWall);
					map.mWallsParams.push_back(paramsTypesList);
				}
				wall = wall.nextSibling().toElement();
			}
		}
The parameters values
We define a base CParam class, and each type of parameter will derive from this class:
		class CParam
		{
		public:
			EParamType  mType;
		};

		class CParamOrnate : CParam
		{
		public:
			CParamOrnate();
			uint8_t mValue;
		};
std::vector<CParam*> mParams;
Before, it only contained a mType variable. But now, every time we change this type, we have to reallocate the list of all the parameters
that are associated with this type.
So here is what the CWall declaration looks like now:
		class CWall
		{
		public:
			CWall();
			virtual ~CWall();

			void    setType(uint8_t type);
			uint8_t getType();
			CWall&  operator=(CWall& rhs);
			void    load(FILE* handle);
			void    save(FILE* handle);

			std::vector<CParam*>    mParams;

		private:
			void    deleteParams();

			uint8_t mType;
		};
getType() simply returns the value of mType, there is nothing special with it.
		uint8_t CWall::getType()
		{
			return  mType;
		}
		void CWall::deleteParams()
		{
			for (size_t i = 0; i < mParams.size(); ++i)
				delete mParams[i];
			mParams.clear();
		}
		void CWall::setType(uint8_t type)
		{
			if (mType == type)
				return;

			mType = type;

			// allocate the params
			deleteParams();
			std::vector& paramTypes = map.mWallsParams[type];

			for (size_t i = 0; i < paramTypes.size(); ++i)
			{
				CParam* newParam = NULL;

				switch (paramTypes[i].mType)
				{
					case eParamOrnate:
						newParam = (CParam*)(new CParamOrnate);
						break;

					default:
						break;
				}
				mParams.push_back(newParam);
			}
		}
load() and save() are pretty self-explanatory they are used to save the type of the wall along with all it's parameters.
And finally the "=" operator is used for the copy, cut and paste functions, that I had to modify too.
Creating the widgets
So for our simple parameter, we have to display a label for it's name and a ComboBox
We will use 2 qml files as models that we will load at run time:
"ParamLabel.qml"...
		import QtQuick 2.5
		import QtQuick.Controls 1.4

		Label {
			height: 20
			text: qsTr("Test")
			verticalAlignment: Text.AlignVCenter
			horizontalAlignment: Text.AlignLeft
			renderType: Text.QtRendering
		}
		import QtQuick 2.5
		import QtQuick.Controls 1.4

		ComboBox {
			property int identifier: -1
			currentIndex: -1
			onCurrentIndexChanged: bridge.setSelParamCombo(identifier, currentIndex);
		}
		QQuickItem*     tileSelGrid;
		QQuickItem*     wallSelGrid;
		QQuickItem*     objSelGrid;

		[...]

		QObject *rootObject = engine.rootObjects().first();
		tileSelGrid = qobject_cast(rootObject->findChild("tSelGrid"));
		wallSelGrid = qobject_cast(rootObject->findChild("wSelGrid"));
		objSelGrid = qobject_cast(rootObject->findChild("oSelGrid"));
		void    CEditor::toolSelect()
		{
			if (bridge.leftPressed == true)
			{
				[...]

				switch (bridge.mTabIndex)
				{
					[...]

				case eTabWalls:
					if (isSelectSingleWall() == true)
					{
						EWallSide   side = getWallSideAbs(mSelectStart);
						uint8_t     type = map.getTile(rect.tl)->mWalls[side].getType();
						bridge.set_selWallType(type);

						deleteParamItems(&mWallParamItems);
						addWallParamsItems(type);
					}
					break;

				default:
					break;
				}

				bridge.updateQMLImage();
			}
		}

		[...]

		void    CEditor::addWallParamsItems(uint8_t type)
		{
			CVec2       pos = mSelectStart / TILE_SIZE;
			EWallSide   side = getWallSideAbs(mSelectStart);
			CWall*      wall = &map.getTile(pos)->mWalls[side];

			std::vector<CParamType>& sourceList = map.mWallsParams[type];

			for (size_t i = 0; i < sourceList.size(); ++i)
			{
				CParam* param = wall->mParams[i];

				if (sourceList[i].mType == eParamOrnate)
				{
					CParamOrnate*   par = (CParamOrnate*)param;
					addLabel(wallSelGrid, sourceList[i].mName + ":", &mWallParamItems);
					addComboBox(wallSelGrid, bridge.ornatesList, &mWallParamItems, i, par->mValue);
				}
			}
		}
		//---------------------------------------------------------------------------------------------
		QQuickItem* CEditor::loadQml(QString file, QQuickItem* parent)
		{
			QQmlComponent   component(myQmlEngine, QUrl(file));
			QQuickItem*     object = qobject_cast<QQuickItem*>(component.create());
			QQmlEngine::setObjectOwnership(object, QQmlEngine::CppOwnership);
			object->setParent(parent);
			object->setParentItem(parent);
			return object;
		}

		//---------------------------------------------------------------------------------------------
		void CEditor::addLabel(QQuickItem* parent, QString text, std::vector<QQuickItem *> *list)
		{
			QQuickItem* object = loadQml("qrc:/ParamLabel.qml", parent);
			object->setProperty("text", QVariant(text));
			list->push_back(object);
		}

		//---------------------------------------------------------------------------------------------
		void CEditor::addComboBox(QQuickItem* parent, QStringList& values, std::vector<QQuickItem*>* list, int id, int index)
		{
			QQuickItem* object = loadQml("qrc:/ParamComboBox.qml", parent);
			object->setProperty("model", QVariant(values));
			object->setProperty("identifier", QVariant(id));
			object->setProperty("currentIndex", QVariant(index));
			list->push_back(object);
		}
Next time we will see how to retrieve those datas in the game to finally display some ornates.