Downloads
Executable for the map editor - exactly the same as in part 12 (Windows 32bits)
Executable for the game (Windows 32bits)
Before you try to compile the code go to the "Projects" tab on the left menu, select the "Run" settings for your kit,
and set the "Working directory" to the path of "editor\data" for the editor or "game\data" for the game.
Code cleaning
This way, the code in "game.cpp" is cleaner and it will be easier to add different types of walls.
		void CGame::drawWall(QImage* image, CVec2 mapPos, CVec2 tablePos, EWallSide side, bool flip)
		{
			CTile*  tile = map.getTile(mapPos);

			if (tile != NULL)
			{
				EWallSide playerSide = player.getWallSide(side);

				if (tile->mWalls[playerSide].getType() != eWallNothing)
				{
					const char* fileName = walls.getFilename(tablePos, side, flip);

					if (fileName[0] != 0)
					{
						// draw the wall
						QImage  wallGfx = fileCache.getImage(fileName);
						CVec2 gfxPos = walls.getGfxPos(tablePos, side, flip);

						graph2D.drawImage(image, gfxPos, wallGfx, 0, flip);

						// draw the ornates
						CWall*  wall = &tile->mWalls[playerSide];

						if (wall->getType() == eWallSimple)
						{
							int ornate = ((CParamOrnate*)wall->mParams[0])->mValue;
							walls.drawOrnate(image, tablePos, side, ornate);
						}
					}
				}
			}
		}
in "cgraphics2d.cpp". I will try to keep all these "low level" graphic routines in this file, so that it will easier to eventually
port this game to another graphics engine.
It's always a good habit to think about portability during development.
Atlasing
So let's try to display the champions heads.
In the original game they were all stored in a single image.
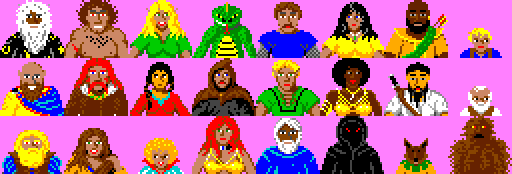
At the time of the original game we called it a sprite sheet.
In the the 3D era we would talk about texture atlasing.
So I wrote a function called drawImageAtlas() to copy only a part of a source image to the screen, and used it to draw the head in
drawChampion().
At the same time I also drew the hands when a champion's inventory is not opened. They appear in another sprite sheet along with
some objects.

		void    CInterface::drawChampion(QImage* image, int num)
		{
			if (isChampionEmpty(num) == false)
			{
				[...]

				if (isChampionDead(num) == true)
				{
					[...]
				}
				else
				{
					QImage  champBg = fileCache.getImage("gfx/interface/ChampInfo.png");
					CVec2   pos(69 * num, 0);
					graph2D.drawImage(image, pos, champBg);

					if (isInInventory() == true && currentChampion == num)
					{
						// draw a background rectangle
						CVec2   pos2(69 * num, 0);
						CRect   rect2(pos2, CVec2(pos2.x + 42, 6));
						graph2D.rect(image, rect2, QColor(68, 68, 68), true);

						CVec2   pos(69 * num + 7, 0);
						CRect   rect(pos, CVec2(pos.x + CHAMP_PORTRAIT_WIDTH - 1, pos.y + CHAMP_PORTRAIT_HEIGHT - 1));
						graph2D.rect(image, rect, QColor(102, 102, 102), true);

						// draw head
						CCharacter* c = &game.characters[num];
						rect = getChampionPortraitRect(c->picture);
						QImage  portraits = fileCache.getImage("gfx/interface/ChampPortraits.png");
						graph2D.drawImageAtlas(image, pos, portraits, rect);

						[...]
					}
					else
					{
						// draw rectangles
						CRect   rect(CVec2(69 * num + 3, 9),
						             CVec2(69 * num + 20, 26));
						graph2D.rect(image, rect, QColor(102, 102, 102), false);

						CRect   rect2(CVec2(69 * num + 23, 9),
						              CVec2(69 * num + 40, 26));
						graph2D.rect(image, rect2, QColor(102, 102, 102), false);

						// draw hands
						QImage  bodyParts = fileCache.getImage("gfx/interface/Items6.png");

						rect = getBodyPartRect(CCharacter::eBodyPartLeftHand);
						CVec2   pos(69 * num + 4, 10);
						graph2D.drawImageAtlas(image, pos, bodyParts, rect);

						rect = getBodyPartRect(CCharacter::eBodyPartRightHand);
						CVec2   pos2(69 * num + 24, 10);
						graph2D.drawImageAtlas(image, pos2, bodyParts, rect);

						[...]
					}

					// bars
					drawBar(image, num, CVec2(69 * num + 46, 2), CCharacter::eStatHealth);
					drawBar(image, num, CVec2(69 * num + 53, 2), CCharacter::eStatStamina);
					drawBar(image, num, CVec2(69 * num + 60, 2), CCharacter::eStatMana);
				}
			}
		}
The texts
The original game used 3 fonts, one for the writings on the walls, one for the scrolls and the last for all the
other texts in the game.
All the characters of a font appears in the same image. So we will use drawImageAtlas() again.
The only modification that I made to it at this point, is to add a parameter to chose the color of the font.
But the hardest part of the drawing routine is to convert a human readable text into sprites positions in the
sprite sheet.
That's why the main part of the text drawing function is 3 big tables used to convert the ASCII code of each character
to a sprite number.
		void   CInterface::drawText(QImage* image, CVec2 pos, EFonts font, const char* text, QColor color)
		{
			// Sprite number tables for each character in ASCII from char 32 to char 120
			// The lowercase letters are used for the spells
			//  !"#$%&'()*+,-./
			// 0123456789:;<=>?
			// @ABCDEFGHIJKLMNO
			// PQRSTUVWXYZ[\]^_
			// `abcdefghijklmno
			// pqrstuvwx

			// eFontStandard
			static const int codesStandard[] =
			{
				//      !     "     #     $     %     &     '     (     )     *     +     ,     -     .     /
				0x00, 0x21, 0x22, 0x23, 0x24, 0x25, 0x26, 0x27, 0x28, 0x29, 0x2A, 0x2B, 0x2C, 0x2D, 0x2E, 0x2F,
				[...]
			};

			// eFontScroll
			static const int codesScroll[] =
			{
				//      !     "     #     $     %     &     '     (     )     *     +     ,     -     .     /
				0x00, 0x21, 0x22, 0x23, 0x24, 0x25, 0x26, 0x1D, 0x28, 0x29, 0x2A, 0x2B, 0x2C, 0x2D, 0x2E, 0x2F,
				[...]
			};

			// eFontWalls
			static const int codesWalls[] =
			{
				//      !     "     #     $     %     &     '     (     )     *     +     ,     -     .     /
				0x1A, 0x1A, 0x1A, 0x1A, 0x1A, 0x1A, 0x1A, 0x21, 0x1A, 0x1A, 0x1A, 0x1A, 0x1A, 0x1A, 0x1B, 0x1A,
				[...]
			};

			const int* codes;
			int offset;
			QImage  file;

			if (font == eFontStandard)
			{
				codes = codesStandard;
				file = fileCache.getImage("gfx/interface/Font.png");
				offset = -2;
				pos.x -= 3;
			}
			else if (font == eFontScroll)
			{
				codes = codesScroll;
				file = fileCache.getImage("gfx/interface/Font.png");
				offset = -2;
				pos.x -= 3;
			}
			else
			{
				codes = codesWalls;
				file = fileCache.getImage("gfx/3DView/WallFont.png");
				offset = 0;
			}

			int i = 0;

			while (text[i] != 0)
			{
				int c = codes[text[i] - 32];

				CRect   rect(CVec2(c * 8, 0),
							 CVec2(c * 8 + 7, file.height() - 1));
				CVec2   cPos(pos.x + i * (8 + offset), pos.y);

				graph2D.drawImageAtlas(image, cPos, file, rect, (font != eFontWalls ? color : QColor(0, 0, 0, 0)));
				i++;
			}
		}

The mouse
In the original game, to enter into a character's inventory we had to click on it's statistics bars.
So now let's begin to handle the mouse.
In "MainForm.ui.qml" there is a MouseArea attached to our screen image:
		Rectangle {
			width: 320
			height: 200
			color: "black"

			property alias image1: image1
			property alias mouseArea1: mouseArea1

			Image {
				id: image1
				anchors.fill: parent
				fillMode: Image.PreserveAspectFit
				cache: false
				clip: true
				smooth: false
				horizontalAlignment: Image.AlignHCenter
				verticalAlignment: Image.AlignVCenter
				source: "image://myimageprovider/0"

				MouseArea {
					id: mouseArea1
					anchors.fill: parent
					hoverEnabled: true
					acceptedButtons: Qt.LeftButton | Qt.RightButton
				}
			}
		}
		mouseArea1.onMouseXChanged: bridge.setMouse(mouseArea1.mouseX, mouseArea1.mouseY, mouseArea1.width, mouseArea1.height);
		mouseArea1.onMouseYChanged: bridge.setMouse(mouseArea1.mouseX, mouseArea1.mouseY, mouseArea1.width, mouseArea1.height);
		mouseArea1.onPressed:bridge.setMousePress(mouse.button);
		mouseArea1.onReleased: bridge.setMouseRelease(mouse.button);
For the mouse clicks it's easy we only store the current state of the mouse button - pressed or released.
But for the mouse position it's a little bit more complex.
As the MouseArea is a child of the screen image, it should be of the same size - 320 x 200.
But because the image is drawn with PreserveAspectFit, due to a bug in Qt, the MouseArea take the size of the
entire window of our game. Even if the image is smaller and if there are black stripes around it, the MouseArea
covers them too.
So we have to do a little bit computation to get the mouse position relative to our image:
		void    CBridge::setMouse(qint32 x, qint32 y, qint32 windowWidth, qint32 windowHeight)
		{
			CVec2   imagePos;
			CVec2   imageSize;
			float widthScale = (float)windowWidth / (float)SCREEN_WIDTH;
			float heightScale = (float)windowHeight / (float)SCREEN_HEIGHT;

			if (widthScale <= heightScale)
			{
				imageSize.x = (int32_t)windowWidth;
				imageSize.y = (int32_t)(widthScale * (float)SCREEN_HEIGHT);
				imagePos.x = 0;
				imagePos.y = (windowHeight - imageSize.y) / 2;
			}
			else
			{
				imageSize.x = (int32_t)(heightScale * (float)SCREEN_WIDTH);
				imageSize.y = (int32_t)windowHeight;
				imagePos.x = (windowWidth - imageSize.x) / 2;
				imagePos.y = 0;
			}

			mMousePos = CVec2(x, y) - imagePos;
			mMousePos.x = (mMousePos.x * SCREEN_WIDTH) / imageSize.x;
			mMousePos.y = (mMousePos.y * SCREEN_HEIGHT) / imageSize.y;
		}

		void    CBridge::setMousePress(qint32 button)
		{
			if (button == Qt::LeftButton)
				mMouseButton = true;
		}

		void    CBridge::setMouseRelease(qint32 button)
		{
			if (button == Qt::LeftButton)
				mMouseButton = false;
		}
The game loop
Now the image provider that is called 60 times per second by the QML will not directly call a function to draw
the graphics, but a game loop:
		QImage CGame::mainLoop()
		{
			QImage image(SCREEN_WIDTH,
						 SCREEN_HEIGHT,
						 QImage::Format_RGBA8888);

			mouse.clearAreas();

			// clear the screen
			image.fill(QColor(0, 0, 0));

			// display
			displayMainView(&image);
			interface.display(&image);

			// processing
			mouse.update();
			SMouseArea* clickedArea = mouse.clickedArea();

			interface.update(clickedArea);

			return image;
		}
times per seconds, that handled the drawing and inputs and logical processing.
It's important in a game to separate the "graphical" and the "logical" parts of each components as it avoids
bugs like flashing graphics, or graphics that are drawn 2 times in the same frame.
It is also important to synchronize the graphics with the animation playing or the inputs handling.
The graphics will change every 60th of second. So there is no need to handle the inputs more often.
And when we handle them, we need to use the value they have exactly at this moment, not 1/100th of second
sooner or later.
At the moment the keyboard is still handled asynchronously. But I will soon modify it to put it in this main loop,
as it will need to be sync'ed with other elements.
As you can see, there are several functions related to the mouse. I will explain them right now.
The mouse - part 2
		#ifndef MOUSE_H
		#define MOUSE_H

		#include "../common/sources/system/cmaths.h"
		#include <vector>

		enum EMouseAreaTypes
		{
			eMouseArea_Inventory = 0,
			eMouseArea_3DView
		};

		struct SMouseArea
		{
			EMouseAreaTypes type;
			CRect   rect;
			void*   param1;
			void*   param2;
		};

		class CMouse
		{
		public:
			CMouse();

			void        update();
			void        clearAreas();
			void        addArea(EMouseAreaTypes type, CRect rect, void* param1 = NULL, void* param2 = NULL);
			SMouseArea* clickedArea();

			CVec2   mPos;
			bool    mButtonPressed;
			bool    mButtonPressing;
			bool    mButtonReleasing;

		private:
			std::vector<SMouseArea>   mAreaList;
		};

		extern CMouse  mouse;

		#endif // MOUSE_H
"bridge.cpp" give us the current state of the mouse button, either pressed or not.
Now imagine that we are clicking on a champion's bars to enter it's character's sheet.
When the sheet is displayed another click on the bars get us back to the game.
Let's say that we press the button during 1 second. If we only use the bit that is in "bridge.cpp",
it will stay at "true" during 1 second, and the graphics will flip 60 times between the sheet and the game.
What we need is a bit that is set to "true" right at the frame when we press the button, and that is set back to
"false" if we hold the button at the next frame.
That's the job of the update() function. Every frame, it updates the variables mButtonPressed, mButtonPressing and
mButtonReleasing.
mButtonPressed is simply a copy of the "bridge.cpp" bit.
mButtonPressing is set to "true" only during the frame when the button is pressed.
And mButtonReleasing is set to "true" only during the frame when the button is released.
update() also copies the position of the mouse from "bridge.cpp" into the mPos variable.
Working with copies of the variables like that is a safety. We are sure that they will not change while we process
them, event if the variables in "bridge.cpp" change.
Now let's speak about the other functions.
The whole mouse system works with a list of "SMouseArea".
Each of mouse areas holds only a rectangle on the screen with a "type" to identify it and some parameters that can
be added in particular cases.
At the beginning of each frame, this list is cleared with the function clearAreas().
While we draw the graphics, if we want to click on a particular one, we add it's rectangle to the list with addArea().
And after everything is drawn, we check if the mouse button is pressed and if it is inside one of the areas with the
function clickedArea().
The trick is that clickArea() parses the rectangle in the reverse order to which they were added.
Because, if for example we draw 2 overlapping objects. We will draw the farthest one before the nearest one.
But if we click on them, we want to hit the nearest one.
And finally, if you look at the CInterface::update() function, you will see that it's quite simple to process the
action associated with a given area:
		void   CInterface::update(SMouseArea* clickedArea)
		{
			if (clickedArea != NULL)
			{
				if (mouse.mButtonPressing == true)
				{
					switch (clickedArea->type)
					{
						case eMouseArea_Inventory:
							mainState = eMainInventory;
							currentChampion = (int)clickedArea->param1;
						break;

						case eMouseArea_3DView:
							mainState = eMainGame;
						break;

						default:
						break;
					}
				}
			}
		}
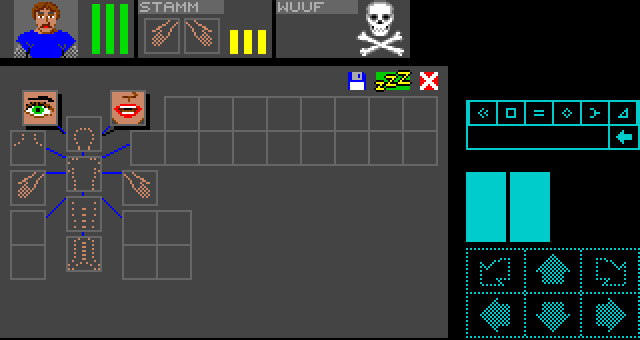
And a little bit more...
So I quickly added the beginning of a character's sheet with it's body parts taken from the sprite sheet
that we saw at the beginning.