Downloads
Executable for the map editor - exactly the same as in part 21 (Windows 32bits)
Executable for the game (Windows 32bits)
Before you try to compile the code go to the "Projects" tab on the left menu, select the "Run" settings for your kit,
and set the "Working directory" to the path of "editor\data" for the editor or "game\data" for the game.
Objects graphics
"data/gfx/interface".
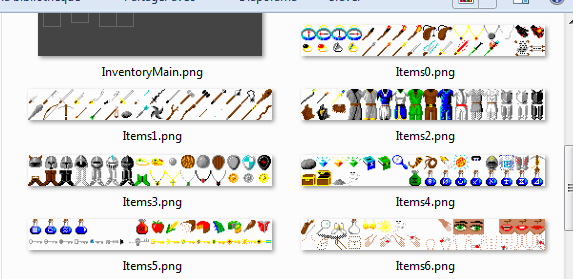
We already used one of these sprites sheets before. To access one of the images, we need the filename of the sheet and
the number of the sprite in this sheet.
So I added these datas to each object in "items.xml":
		<?xml version="1.0" encoding="utf-8"?>
		<items>
			<!-- ======================== Weapons ======================== -->
			<!-- EYE OF TIME -->
			<item name="ITEM001">
				<category>Weapon</category>
				<floor_image>00W_Ring.png</floor_image>
				<image_file>Items0.png</image_file>
				<image_num>17</image_num>
			</item>

			<!-- STORMRING -->
			<item name="ITEM002">
				<category>Weapon</category>
				<floor_image>00W_Ring.png</floor_image>
				<image_file>Items0.png</image_file>
				<image_num>19</image_num>
			</item>

			[...]
		</items>
Mouse areas
drop on the ground an object that is in our hand.
The current object that we are holding in our hand will be stored in the mObjectInHand variable in the mouse class.
When the hand is empty, this object's type will be 0.
		enum EMouseAreaTypes
		{
			eMouseArea_None = 0,

			// interface areas
			[...]

			// game areas
			eMouseAreaG_Champion,
			eMouseAreaG_DoorButton,
			eMouseAreaG_PickObject,
			eMouseAreaG_DropObject
		};

		class CMouse
		{
		public:
			[...]
			CObject mObjectInHand;
			[...]
		};
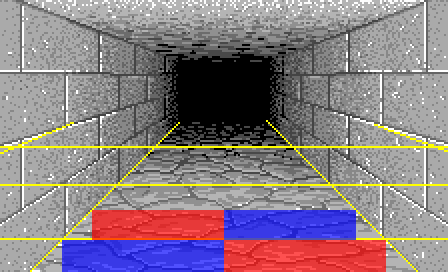
objects just in front of us - the "front" row of the tile ahead of the player.
And of course, you can drop objects only in the same places.
To clarify this, here is an image of the mouse areas we will use to drop objects:
But there is another thing to take into account: if there is a wall right in front of us, we don't need to add the
mouse areas for the tile ahead of us.
So I first wrote a small function to check if there is a wall in front of the player
		bool CObjects::isWallInFront()
		{
			CTile*  tile = map.getTile(player.pos);
			EWallSide   side = player.getWallSide(eWallSideUp);
			CWall*  wall = &tile->mWalls[side];

			return (wall->getType() != eWallNothing);
		}
		// draw the object on screen
		pos -= CVec2(scaledObject.size().width() / 2, scaledObject.size().height() - 1);
		graph2D.drawImage(image, pos, scaledObject, 0, false, QRect(0, 33, MAINVIEW_WIDTH, MAINVIEW_HEIGHT));

		// add the mouse area
		if (mouse.mObjectInHand.getType() == 0)
		{
			if (tablePos.x >= WALL_TABLE_WIDTH - 1 && tablePos.x <= WALL_TABLE_WIDTH)
			{
				if (tablePos.y == (WALL_TABLE_HEIGHT - 1) * 2 ||
					(tablePos.y == (WALL_TABLE_HEIGHT - 2) * 2 + 1 && isWallInFront() == false))
				{
					CRect   mouseRect(pos, CVec2(pos.x + scaledObject.width() - 1, pos.y + scaledObject.height() - 1));
					mouse.addArea(eMouseAreaG_PickObject, mouseRect, eCursor_Hand, (void*)stack, (void*)i);
				}
			}
		}
We check tablePos.y to know if we are on the tile where the player is or the tile just ahead.
And we use isWallInFront() to see if there is a wall in the latter case.
You can note that in parameters we put the pointer to the stack and the index of the object in this stack.
Then for the "drop areas", as we need to have the map coordinates of the stack, it is easier to do it separately in
drawBackRow() and drawFrontRow().
Let's see that in drawBackRow():
		void CObjects::drawBackRow(QImage* image, CVec2 mapPos, CVec2 tablePos)
		{
			[...]

			CVec2   mapLeft = mapPos * 2 + pos1;
			CVec2   mapRight = mapPos * 2 + pos2;
			drawObjectsStack(image, mapLeft, tablePos * 2 + CVec2(0, 0));
			drawObjectsStack(image, mapRight, tablePos * 2 + CVec2(1, 0));

			// mouse areas to drop object
			if (mouse.mObjectInHand.getType() != 0)
			{
				if (tablePos.x == WALL_TABLE_WIDTH / 2 &&
					tablePos.y == WALL_TABLE_HEIGHT - 1)
				{
					CRect   rectLeft(CVec2(31, 153), CVec2(111, 168));
					mouse.addArea(eMouseAreaG_DropObject, rectLeft, eCursor_Hand, (void*)mapLeft.x, (void*)mapLeft.y);
					CRect   rectRight(CVec2(112, 153), CVec2(192, 168));
					mouse.addArea(eMouseAreaG_DropObject, rectRight, eCursor_Hand, (void*)mapRight.x, (void*)mapRight.y);
				}
			}
		}
Here we don't have to check for a wall because as it is the back row, it's the tile where the player is.
But we check for a wall in the case of the front row:
		void CObjects::drawFrontRow(QImage* image, CVec2 mapPos, CVec2 tablePos)
		{
			[...]

			CVec2   mapLeft = mapPos * 2 + pos1;
			CVec2   mapRight = mapPos * 2 + pos2;
			drawObjectsStack(image, mapLeft, tablePos * 2 + CVec2(0, 1));
			drawObjectsStack(image, mapRight, tablePos * 2 + CVec2(1, 1));

			// mouse areas to drop object
			if (mouse.mObjectInHand.getType() != 0)
			{
				if (tablePos.x == WALL_TABLE_WIDTH / 2 &&
					tablePos.y == WALL_TABLE_HEIGHT - 2 &&
					isWallInFront() == false)
				{
					CRect   rectLeft(CVec2(46, 138), CVec2(111, 152));
					mouse.addArea(eMouseAreaG_DropObject, rectLeft, eCursor_Hand, (void*)mapLeft.x, (void*)mapLeft.y);
					CRect   rectRight(CVec2(112, 138), CVec2(177, 152));
					mouse.addArea(eMouseAreaG_DropObject, rectRight, eCursor_Hand, (void*)mapRight.x, (void*)mapRight.y);
				}
			}
		}
Checking the areas
		void CGame::update(SMouseArea* clickedArea)
		{
			[...]

			if (clickedArea != NULL)
			{
				if (mouse.mButtonPressing == true)
				{
					if (clickedArea->type == eMouseAreaG_Champion)
					{
						[...]
					}
					else if (clickedArea->type == eMouseAreaG_DoorButton)
					{
						[...]
					}
					else if (clickedArea->type == eMouseAreaG_PickObject)
					{
						CObjectStack*   stack = (CObjectStack*)clickedArea->param1;
						int index = (int)clickedArea->param2;
						mouse.mObjectInHand = stack->getObject(index);
						stack->removeObject(index);

						if (stack->getSize() == 0)
							map.removeObjectsStack(stack->mPos);
					}
					else if (clickedArea->type == eMouseAreaG_DropObject)
					{
						CVec2   pos = CVec2((int)clickedArea->param1, (int)clickedArea->param2);
						CObjectStack*   stack = map.addObjectsStack(pos);
						stack->addObject(mouse.mObjectInHand);
						mouse.mObjectInHand.setType(0);
					}
				}
			}
		}
we check if the stack is empty to delete it completely.
In the case of dropping an object, we add it to the stack or create a new one - map.addObjectsStack() handles
both cases - then we set the type of mObjectInHand to 0 to "empty" the hand.
Object as a cursor
To draw the object instead of the cursor when we hold one, it's pretty simple.
		SMouseArea* CMouse::clickedArea(QImage* image)
		{
			[...]

			if (area == NULL || area->cursor != eCursor_None)
			{
				if (area == NULL)
				{
					[...]
				}
				else if (area->cursor == eCursor_Arrow)
				{
					[...]
				}
				else
				{
					if (mObjectInHand.getType() == 0)
					{
						QImage  cursor = fileCache.getImage("gfx/interface/CursorHand.png");
						graph2D.drawImage(image, mPos, cursor);
					}
					else
					{
						CObjects::CObjectInfo  object = objects.mObjectInfos[mObjectInHand.getType() - 1];
						QImage  cursor = fileCache.getImage(object.imageFile.toLocal8Bit().constData());
						CRect   rect = interface.getItemRect(object.imageNum);
						graph2D.drawImageAtlas(image, mPos - CVec2(ITEM_WIDTH / 2, ITEM_HEIGHT / 2), cursor, rect);
					}
				}

			}

			[...]
		}
and sprite number from mObjectInfos.
Then we draw the sprite with the "atlas" function as we did before.
You can see that i do all of this only in the case where we were drawing the "hand" cursor before.
Because I noted that the arrow had the priority in the original game.
Drawing the object's name

Displaying the object's name above the "spell box" is quite simple too.
As before we only have to get the name of the object from mObjectInfos given it's type.
		void CInterface::drawObjectName(QImage* image)
		{
			int type = mouse.mObjectInHand.getType();

			if (type != 0)
			{
				std::string& name = objects.mObjectInfos[type - 1].name;
				drawText(image, CVec2(233, 33), eFontStandard, name.c_str(), MAIN_INTERFACE_COLOR);
			}
		}