Downloads
Executable for the map editor (Windows 32bits)
Executable for the game (Windows 32bits)
Before you try to compile the code go to the "Projects" tab on the left menu, select the "Run" settings for your kit,
and set the "Working directory" to the path of "editor\data" for the editor or "game\data" for the game.
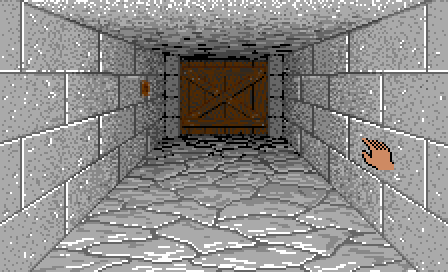
Fixing the doors
Some of them didn't have the same color as the door, and parts of the see-through ornates were missing due to
scaling.
To fix that we will draw the doors in a new way.
first, we won't use all the doors images, only the nearest one.
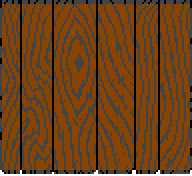
The we will draw the ornate on it, eventually making the pixels transparent if needed.

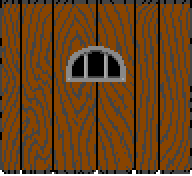
Finally, we will darken and scale down the whole image.
This is what we do in the drawDoor() function.
		void    CDoors::drawDoor(QImage* image, CVec2 tablePos, CTile* tile)
		{
			SDoorElem&  cell = tabDoor[tablePos.y][tablePos.x];
			int doorNum = cell.file[0] - '0';

			if (doorNum >= 0)
			{
				//----------------------------------------------------------------------------
				// get door image
				int doorType = tile->getDoorParam("Type");
				std::string fileName = std::string("gfx/3DView/doors/") + doorsDatas[doorType].files[2].toUtf8().constData();
				QImage  doorImage = fileCache.getImage(fileName);

				//----------------------------------------------------------------------------
				// draw the ornate
				int ornateType = tile->getDoorOrnateParam("Ornate");
				std::string ornateName = doorOrnatesDatas[ornateType].file.toUtf8().constData();

				QImage  ornateImage;
				CVec2   ornatePos;

				if (ornateName.empty() == false)
				{
					ornateImage = fileCache.getImage(std::string("gfx/3DView/door_ornates/") + ornateName);

					ornatePos = doorOrnatesDatas[ornateType].pos;
					graph2D.drawImage(&doorImage, ornatePos, ornateImage);

					// see-through ornates
					if (ornateType == DOOR_ORNATE_ARCHED || ornateType == DOOR_ORNATE_ARCHED + 1)
					{
						QSize   qSize = ornateImage.size();

						for (int y = 0; y < qSize.height(); ++y)
							for (int x = 0; x < qSize.width(); ++x)
							{
								QRgb pixel = ornateImage.pixel(x, y);

								if (qRed(pixel) == 204 &&
									qGreen(pixel) == 136 &&
									qBlue(pixel) == 102)
								{
									CVec2   destPos = ornatePos + CVec2(x, y);
									doorImage.setPixel(destPos.x, destPos.y, 0);
								}
							}
					}
				}

				//----------------------------------------------------------------------------
				// darken
				static const float shadowLevels[] = {0.0f, 0.2f, 0.4f};
				float shadow = shadowLevels[WALL_TABLE_HEIGHT - 2 - tablePos.y];
				graph2D.darken(&doorImage, shadow);

				//----------------------------------------------------------------------------
				// draw
				static const int doorScalesX[] = {96, 64, 44};
				static const int doorScalesY[] = {88, 61, 38};
				float scaleX = (float)doorScalesX[WALL_TABLE_HEIGHT - 2 - tablePos.y] / 96.0;
				float scaleY = (float)doorScalesY[WALL_TABLE_HEIGHT - 2 - tablePos.y] / 88.0;
				bool isHorizontal = tile->getBoolParam("isHorizontal");
				int doorPos = tile->getIntParam("pos") / DOOR_POS_FACTOR;

				if (isHorizontal == false)
				{
					//----------------------------------------------------------------------------
					// vertical door
					doorPos *= scaleY;

					CVec2 pos(cell.x, cell.y + doorPos);
					QRect clip(cell.cx1, cell.cy1,
							   cell.cx2 - cell.cx1 + 1, cell.cy2 - cell.cy1 + 1);
					clipToMainView(&clip);

					if (clip.width() > 0 && clip.height() > 0)
						graph2D.drawImageScaled(image, pos, doorImage, scaleX, false, scaleY, clip);
				}
				else
				{
					//----------------------------------------------------------------------------
					// horizontal door
					doorPos *= scaleX;

					CVec2 pos(cell.x + doorPos, cell.y);
					int halfwidth = (cell.cx2 - cell.cx1 + 1) / 2;

					QRect clip1(cell.cx1, cell.cy1,
							   halfwidth + doorPos, cell.cy2 - cell.cy1 + 1);
					clipToMainView(&clip1);

					if (clip1.width() > 0 && clip1.height() > 0)
						graph2D.drawImageScaled(image, pos, doorImage, scaleX, false, scaleY, clip1);

					pos.x = cell.x - doorPos;
					QRect clip2(cell.cx1 + halfwidth - doorPos, cell.cy1,
							   halfwidth + doorPos, cell.cy2 - cell.cy1 + 1);
					clipToMainView(&clip2);

					if (clip2.width() > 0 && clip2.height() > 0)
						graph2D.drawImageScaled(image, pos, doorImage, scaleX, false, scaleY, clip2);
				}
			}
		}
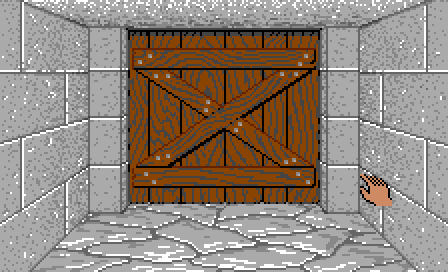
Object shadow
As in the original game I simply drew a black copy of the object 2 pixels to the right and to the bottom of the
cursor.

The switches
		<ornate name="Lever Off">
			<image_front>Lever_Off_front.png</image_front>
			<image_side>Lever_Off_side.png</image_side>
			<pos_front x="105" y="69"/>
			<pos_side x="47" y="72"/>
		</ornate>

		<ornate name="Lever On">
			<image_front>Lever_On_front.png</image_front>
			<image_side>Lever_On_side.png</image_side>
			<pos_front x="105" y="69"/>
			<pos_side x="47" y="72"/>
		</ornate>
		<wall name="Switch">
			<image>Switch.png</image>
			<param type="enum" values="Lever;Green button;Blue button;Big button">Type</param>
			<param type="script">onTurnOn</param>
			<param type="script">onTurnOff</param>
			<param type="bool">isOn</param>
		</wall>
You will see that we won't only have to open doors like in the last part.
There will be a bunch of new commands in the scripts.
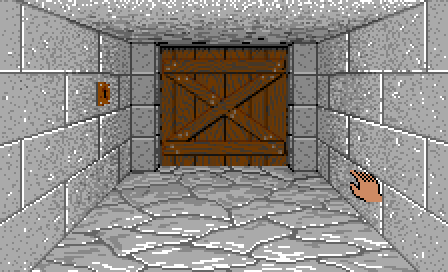
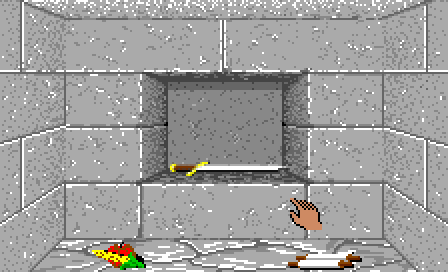
The hidden alcove
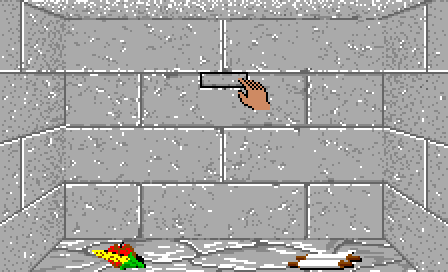
Once you press it, it disappears and it's replaced by an alcove with a flachion inside it.
So we need 3 new commands for this script:
		Target Wall 6 3 down
		SetType 5
		SetEnum Type 1
		AddObject 10
SetEnum changes the type of this alcove to a square one.
And AddObject add the falchion to the current target's stack - that's to say the stack associated with the alcove.
Their code is pretty simple. By the way, I had to change the executeTarget() function to keep track of the target's
position and side, and not only a pointer to it.
		//--------------------------------------------------------------------------
		void CScripts::executeSetType(std::vector<std::string>& words)
		{
			int type = stoi(words[1]);

			if (mTargetType == eTargetType_Tile)
			{
			}
			else
			{
				CWall*  target = (CWall*)mTarget;
				target->setType(type);
			}
		}

		//--------------------------------------------------------------------------
		void CScripts::executeSetEnum(std::vector<std::string>& words)
		{
			QString param = QString::fromStdString(words[1]);
			int type = stoi(words[2]);

			if (mTargetType == eTargetType_Tile)
			{
			}
			else
			{
				CWall*  target = (CWall*)mTarget;
				target->setEnumParam(param, type);
			}
		}

		//--------------------------------------------------------------------------
		void CScripts::executeAddObject(std::vector<std::string>& words)
		{
			int type = stoi(words[1]);
			CObjectStack*   stack = map.addObjectsStack(mTargetPos, mTargetSide);
			CObject newObj;
			newObj.setType(type);
			stack->addObject(newObj);
		}
The 2 next switches
The second switch we encounter only opens door 5. So it will be associated with 2 scripts: "L02_OpenDoor05.txt"
		Target Tile 5 9
		SetBool isOpened true
		Target Tile 5 9
		SetBool isOpened false
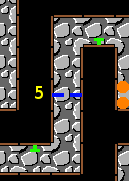
The door 19 puzzle
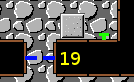
The next switch appears near door 19 and it opens it.
But it is part of a little puzzle as the pressure plate next to it closes the door.
There is nothing special here. The switch is associated to a "L02_OpenDoor19.txt" script, and the plate is
associated to a "L02_CloseDoor19.txt" one.
Note that the switch's script is called both when it's turned on or off.
The door 20 puzzle

The trick is that these switches must be both turned on to open the door.
So in each of the switches' scripts I added an "If" command to test the state of the other switch.
		Target Tile 18 20
		If Wall 22 19 right isOn
		SetBool isOpened true
To achieve that I only had to add a boolean test in executeLine():
		void CScripts::executeLine(std::vector<std::string>& words)
		{
			if (lastIf == true)
			{
				if (words[0] == "Target")
					executeTarget(words);
				else if (words[0] == "SetBool")
					executeSetBool(words);
				else if (words[0] == "SwitchBool")
					executeSwitchBool(words);
				else if (words[0] == "SetType")
					executeSetType(words);
				else if (words[0] == "SetEnum")
					executeSetEnum(words);
				else if (words[0] == "AddObject")
					executeAddObject(words);
				else if (words[0] == "If")
					executeIf(words);
				else if (words[0] == "SetString")
					executeSetString(words);
			}
			else
			{
				lastIf = true;
			}
		}
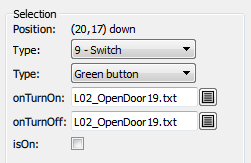
Door 24 and the hidden room
Door 24 is opened by a lever in the small room on, the left.
Behind this door there is another lever that make some walls of the nearby room disappear
To achieve that, we only have to change the type of these walls.
		Target Wall 14 28 down
		SetType 0
		Target Wall 13 29 right
		SetType 0
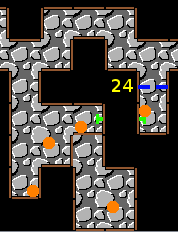
The disappearing text

After you got through door 16, you encounter a pressure plate and see a text on a wall further.
The trick is that if you step on the plate, once you leave it, the text disappears.
You have to leave an item on the plate to be able to read the text.
To hide the text we only have to change the wall's type.
		Target Wall 22 8 left
		SetType 1
		Target Wall 22 8 left
		SetType 6
		SetString Text WALL_TEXT03
		void CScripts::executeSetString(std::vector<std::string>& words)
		{
			QString param = QString::fromStdString(words[1]);

			if (mTargetType == eTargetType_Tile)
			{
			}
			else
			{
				((CWall*)mTarget)->setStringParam(param, words[2]);
			}
		}