Bresenham's line algorithm
The code in this article was written using Code::Blocks and SDL 2.
You can read
here a guide to install this sofware.
Although it is based on SDL, I don't use its functions directly. I have written a small library with a few basic
functions to ease the understanding and the portability to another language.
You can read more about this lib
here.
How does your computer draw a line on the screen ?
It's fairly easy to understand for an horizontal or vertical line, but what about a line of any slope that you
would draw in a painting software ?
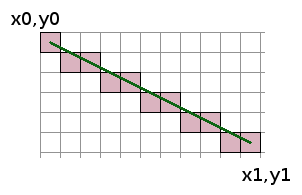
Let's look at this diagram.
It shows the pixels we have to draw if we want to represent the ideal line in green.
We can notice that only 1 pixel is lit for every x coordinate. That is the nearest one to the ideal line.
To simplify the explanations, from now on we will only talk about the lines like the one on this diagram that
follow these constraints:
- x1 > x0 : x increases.
- y1 > y0 : y increases.
- (x1 - x0) > (y1 - y0) : the line is more horizontal than vertical.
We will talk about the other cases at the end once we have well defined the algorithm for this one.
Now how to find the equation to draw this line ?
Let's remember an equation that each of you should know:
y = m * x + b
m is easy to understand. It's the slope of the line - the amount of increase in y divided by the amount of increase
in x.
In our case:
m = (y1 - y0) / (x1 - x0)
I don't want to compute b, so let's rework a little bit our equation. We had:
y = m * x + b
In particular, our first point (x0, y0) belong to this line so it also follow this equation:
y0 = m * x0 + b
Now if we substract this last equation from the previous one, we get:
y - y0 = m * (x - x0) + b - b
And b disappears. So after a little rewriting, we get a new formula for our line:
y = m * (x - x0) + y0
The simplest code to draw our line should then look like that:
		// line coordinates
		int x0 = 0;
		int y0 = 0;
		int x1 = 30;
		int y1 = 10;

		float slope = (float)(y1 - y0) / (float)(x1 - x0);

		for (int x = x0; x <= x1; ++x)
		{
			float y = slope * (x - x0) + y0;
			gfx.setPixel(x, y, Color(255, 255, 255));
		}
		gfx.render();

		Download source code
		Download executable for Windows
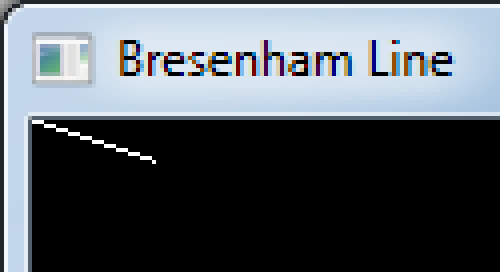
Here is the result:
This line looks nice but there is a little something wrong with it.
If you look at the first and the last horizontal segments, they should be balanced.
This is only a rounding problem. That would be easy to fix, but let's put that aside as we will address this
problem later in another way.
So we have a drawing routine that works. Now what's the point of the Bresenham's algorithm ?
Will it draw a nicer line ?
Well, not really.
Bresenham was a guy who worked for IBM. He wrote this algorithm in 1962.
At this time computers were very slow so everything had to be optimized.
In fact his algorithm is just a very optimized version of the one we just wrote.
Lots of people nowadays say that optimizing is not useful because computers are far more efficient.
So is it really worth the effort ? Well, we'll check that ourselves later.
Anyways it's a good exercise to understand optimisation and how a processor works.
So let's look at that step by step.
Before answering this question, let's ask ourselves what makes this code slow ?
Let's look at the code again:
		// line coordinates
		int x0 = 0;
		int y0 = 0;
		int x1 = 30;
		int y1 = 10;

		float slope = (float)(y1 - y0) / (float)(x1 - x0);

		for (int x = x0; x <= x1; ++x)
		{
			float y = slope * (x - x0) + y0;
			gfx.setPixel(x, y, Color(255, 255, 255));
		}
Note: I omitted the gfx.render() function because it is not part of the algorithm itself, it is only called at the
end to display the result on the screen.
So what can we see in this code ? There is:
- A loop
- Some integer values
- Some floating point values
- Calculations on these values: additions, substractions, multiplications, and divisions
- A call to the function gfx.setPixel
Here are a few important rules that we can give about all the elements that we listed.
When you have a loop everything inside of the loop is executed more times than if it was outside of the loop.
In some programs this can be many more times...
In our code, the loop is executed 21 times. That's the reason why we compute the slope outside of the loop.
Because, as it is a constant value, there is no need to compute it 20 times...
Integers are faster than floating points. Even if nowadays each procesor has a built in floating point coprocessor,
intergers calculations are always faster than floting points ones.
Furthermore, when you use floating points there is often a moment when you have to convert them to/from integers.
With integers, additions and substractions are faster than multiplications and divisions.
Well, that was true in 1962, but now it's only partially true.
Divisions are always slower (unless it's by a power of 2), but modern processors use algorithms that makes
multiplications as fast as additions.
Anyway we will consider that we are still in 1962 because I want to explain the original algorithm.
With floating points, multiplication is slower than addition on most of modern processors.
Always be careful with functions that you didn't code yourself.
Is gfx.setPixel() fast ? Does it take the same time when you call it twice with the same parameters ?
Well, as I coded it myself, I can tell you that it is perhabs not the most efficient function for this
particular algorithm but it should be fast enough.
Anyway we won't recode it as it is not the purpose of this article.
The important point is that even if we optimise everything in the algorithm, it will always be called one time for
each pixel of the line. So it's total time of execution won't change.
So now, let's see the optimisations that Bresenham did one after the other.
Removing the multiplication
Look at the formula inside the loop:
float y = slope * (x - x0) + y0;
How does y change while x goes from x0 to x1 ?
At the beginning, when x = x0, (x - x0) cancels out and y starts at y0.
Then every time x is increased by 1, y is increased by slope.
So we can rewrite our loop:
		float slope = (float)(y1 - y0) / (float)(x1 - x0);
		float y = y0;

		for (int x = x0; x <= x1; ++x)
		{
			gfx.setPixel(x, y, Color(255, 255, 255));
			y += slope;
		}
		gfx.render();

		Download source code
		Download executable for Windows
That's a great improvement. There is a lot less calculation inside the loop.
There is only one addition left !
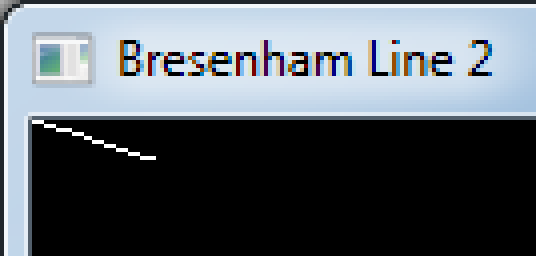
Now let's look at the result:
Well, there is still something wrong with this line.
It turns out that it's a rounding error like for the first one.
But you can ask yourself where is the rounding when you use only floating point values ?
That's one of the awkward thing when using C or C++: it does hidden things.
Our variable y is a float. The only calculation we do on it is an addition with another float variable, so it
stays a float.
But the setPixel() function takes ints as parameters. So the C compiler implicitely converts our float y to an int.
And when it does so, it always take the least integer.
If our y has a value of say 5.7, the conversion to an int will give 5.
But we saw at the beginning that we should take the nearest interger to get the pixel that is the closest to the
ideal line.
So we really need to fix this rounding problem. And the way to do it is probably the most interesting part of the
Bresenham's algorithm.
As we said, each time x is increased by one, y is increased by slope.
y must be a float value because the slope is a float.
But in the end, we draw a pixel whose coordinates are integers.
So let's separate these values. On one side we will have an integer y that represents the true coordinate of the
current pixel.
And on the other side we will have a float value that stores the sum of the slopes - the remainder.
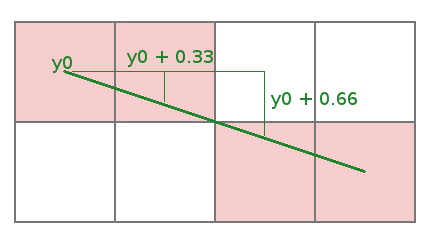
Let's look in detail what is happening on this zoomed image.
Here we have the same slope as in our code: 10/30 = 1/3.
Notice that the ideal line we want to draw begins at the center of the first pixel.
For the first pixel the value of y is y0 and we draw the the pixel at y0.
For the second pixel the value of y is now y0 + 0.333... and we still draw the pixel at y0.
For the third pixel the value of y is y0 + 0.666... and we draw the pixel at (y0 + 1).
Notice that we change the coordinate of the pixel we draw because the floating point value exceeds 0.5.
Now let's name the variables to make things clearer.
- Let's name oldY the floating point y that we used so far
- The new integer y will be called simply y...
- The remainder floating value will be called "error" to follow the names used in most articles that explain
this algorithm
So we have this relation:
oldY = y + error
Now let's recapitulate our algorithm:
We start by setting y = y0 and error = 0
At each step:
- We add slope to error
- If error is greater than 0.5, we add 1 to y
But to follow oldy = y + error, if we increase y by 1, we must also substract 1 from error.
That leads to this code:
		float slope = (float)(y1 - y0) / (float)(x1 - x0);
		int y = y0;
		float error = 0.0;

		for (int x = x0; x <= x1; ++x)
		{
			gfx.setPixel(x, y, Color(255, 255, 255));
			error += slope;

			if (error >= 0.5)
			{
				y++;
				error -= 1.0;
			}
		}
		gfx.render();

		Download source code
		Download executable for Windows
And this is what we get:
The fact that we compare error with 0.5 fixed our rounding problem.
If you take a screenshot of the program, load it in the Gimp and draw a line of another color above it you will
see that you get exactly the same pixels. Because the Gimp like most graphical softwares use the Bresenham
algorithm too.
Let's go on with our optimisations.
First we will offset the error.
error starts at 0.0 then we compare it with 0.5.
It would be exactly the same if we made is start at -0.5 then compare it with 0.0.
Comparing a value with 0 is a little bit faster than comparing it with a constant. It will be particularly true when we
have it converted to an integer.
So our code becomes:
		int y = y0;

		float slope = (float)(y1 - y0) / (float)(x1 - x0);
		float error = -0.5;

		for (int x = x0; x <= x1; ++x)
		{
			gfx.setPixel(x, y, Color(255, 255, 255));
			error += slope;

			if (error >= 0.0)
			{
				y++;
				error -= 1.0;
			}
		}
		gfx.render();

		Download source code
		Download executable for Windows
Now we will do a little renaming job as it will be clearer for the next stage.
We'll name "dx" the value (x1 - x0).
We'll name "dy" the value (y1 - y0).
And finally we'll name errorInc the value we add to error when y changes, that's to say -1.0.
		int y = y0;

		int dx = x1 - x0;
		int dy = y1 - y0;
		float slope = (float)dy / (float)dx;
		float error = -0.5;
		float errorInc = -1.0;

		for (int x = x0; x <= x1; ++x)
		{
			gfx.setPixel(x, y, Color(255, 255, 255));
			error += slope;

			if (error >= 0.0)
			{
				y++;
				error += errorInc;
			}
		}
		gfx.render();

		Download source code
		Download executable for Windows
Now we will convert the floating point values to integers.
The only floating point variables that we have are the ones that are used for the calculation of error: slope,
error and errorInc.
To avoid loosing precision the idea is to multiply these variables by a quantity that make them all integers.
slope is dy/dx so we must multiply it at least by dx to make it integer.
error start at -0.5 so we have to multiply it at least by 2.
Finally, if we multiply all these variables by 2*dx they will all become integers.
		int y = y0;

		int dx = x1 - x0;
		int dy = y1 - y0;
		int slope = 2 * dy;
		int error = -dx;
		int errorInc = -2 * dx;

		for (int x = x0; x <= x1; ++x)
		{
			gfx.setPixel(x, y, Color(255, 255, 255));
			error += slope;

			if (error >= 0)
			{
				y++;
				error += errorInc;
			}
		}
		gfx.render();

		Download source code
		Download executable for Windows
Was it worth the effort ?
Now we did everything we could to optimize the code.
At this point, articles that explain the Bresenham's algorithm generally try to reduce the number of variables or
to invert the sign of error and errorInc.
These are only aesthetic changes that does not improve the speed of the code.
So now we will try to see if all these optimisations really improved the speed of the code.
The SDL library has a high accuracy timer that is meant just for this kind of tasks.
I added 2 functions to my lib in the System module:
		void    StartPerfCounter();
		float   StopPerfCounter();
You just call StartPerfCounter() at the beginning of the function you want to time, and StopPerfCounter() at the
end.
StopPerfCounter() returns a float that is the number of milliseconds elapsed between the two calls.
I used these functions to time on one side the first routine we wrote at the beginning and on the other side the
last one we wrote.
To get more precision I draw a bunch of lines spreading through the width of the window and following the
constraints we defined at the beginning.
Here is the full code of this test:
		#include <stdio.h>
		#include <stdlib.h>
		#include <math.h>
		#include "main.h"
		#include "Graphics.h"
		#include "System.h"

		#define SCREEN_WIDTH    640
		#define SCREEN_HEIGHT   480

		void drawLineSlow(int x0, int y0, int x1, int y1, Color c)
		{
			float slope = (float)(y1 - y0) / (float)(x1 - x0);

			for (int x = x0; x <= x1; ++x)
			{
				float y = slope * (x - x0) + y0;
				gfx.setPixel(x, y, c);
			}
		}

		void drawLine(int x0, int y0, int x1, int y1, Color c)
		{
			int y = y0;

			int dx = x1 - x0;
			int dy = y1 - y0;
			int slope = 2 * dy;
			int error = -dx;
			int errorInc = -2 * dx;

			for (int x = x0; x <= x1; ++x)
			{
				gfx.setPixel(x, y, c);
				error += slope;

				if (error >= 0)
				{
					y++;
					error += errorInc;
				}
			}
		}

		int main(int argc, char* argv[])
		{
			// init the window
			gfx.init("Bresenham Line 7", SCREEN_WIDTH, SCREEN_HEIGHT);
			gfx.init2D();

			// test the slow function
			gfx.clearScreen(Color(0, 0, 0, SDL_ALPHA_OPAQUE));
			sys.StartPerfCounter();

			for (int i = 10; i < SCREEN_WIDTH; ++i)
				drawLineSlow(0, 0, i, 10, Color(i & 0xff, 255, 0));

			float time1 = sys.StopPerfCounter();
			printf("time1: %f ms\n", time1);

			// test the fast function
			gfx.clearScreen(Color(0, 0, 0, SDL_ALPHA_OPAQUE));
			sys.StartPerfCounter();

			for (int i = 10; i < SCREEN_WIDTH; ++i)
				drawLine(0, 0, i, 10, Color(i & 0xff, 255, 0));

			float time2 = sys.StopPerfCounter();
			printf("time2: %f ms\n", time2);

			gfx.render();

			while (sys.isQuitRequested() == false)
			{
				sys.processEvents();
			}

			gfx.quit();

			return EXIT_SUCCESS;
		}

		Download source code
		Download executable for Windows
Runing it 3 times on my computer that has an Intel Core i3-4330, I get an average of 0.938 ms for the first
routine and 0.514 ms for the optimised one.
So even on a modern processor with the optimisations of the compiler we wrote a code that is about 2 times faster.
That's not bad at all.
And remember that this time include the execution time of setPixel() that we did not optimise.
Generalizing the algorithm
If we use our optimised code to draw a line that is nearly vertical. Like.
		int x0 = 0;
		int y0 = 0;
		int x1 = 10;
		int y1 = 30;
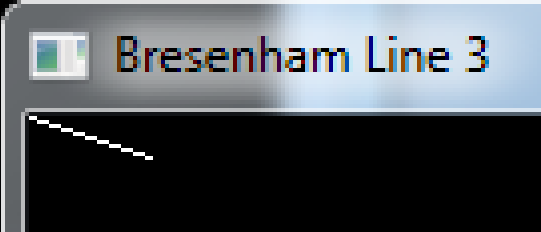
We get a 45 degrees line:
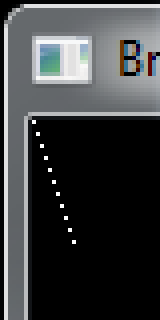
With the first function we wrote we get another result.
Some pixels are missing.
It is easy to understand as our function only draws 1 pixel for each x coordinate.
With lines that are more vertical we should loop through y instead of x.
Now remember the constraints we set up at the beginning:
- x1 > x0 : x increases.
- y1 > y0 : y increases.
- (x1 - x0) > (y1 - y0) : the line is more horizontal than vertical.
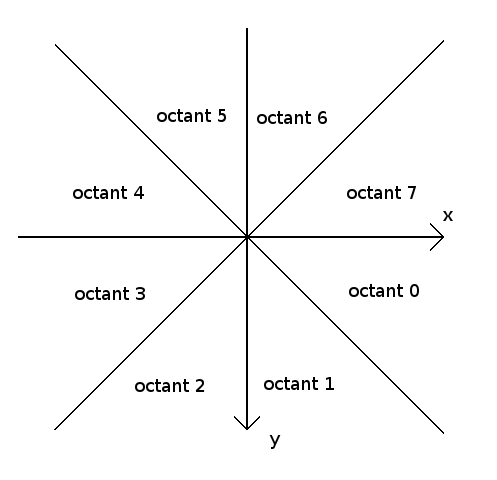
We can divide the screen plane into 8 "octants".
The constraints above limit us to octant 0.
Now generally when we get here the other articles simply write a seperate function for each octant and 2 other
cases for perfectly horizontal and vertical lines.
This is in the spirit of the algorithm to get the fastest code.
But I prefer a more compact code even if it is a litle bit slower. It will be far easier if we have to modify
this code in the future.
Let's look at the octants 0, 3, 4 and 7, these are all the cases where the line is more horizontal than vertical.
For all these cases we will keep the loop trough the x coordinates. But the direction can change: x1 can be less
than x0 or y1 can be less than y0.
We will introduce 2 mathematical macros.
ABS returns the absolute value of a number.
#define ABS(_x) ((_x) >= 0 ? (_x) : -(_x))
SGN returns the sign of a value: either -1, 1 or 0 if the number is negative, positive or null.
		#define SGN(_x) ((_x) < 0 ? -1 : \
		                 ((_x) > 0 ? 1 : 0))
Now we will use 2 increment variables for x and y to handle all the cases.
		void drawLine(int x0, int y0, int x1, int y1, Color c)
		{
			int y = y0;

			int dx = x1 - x0;
			int dy = y1 - y0;
			int incX = SGN(dx);
			int incY = SGN(dy);
			int slope = 2 * ABS(dy);
			int error = -ABS(dx);
			int errorInc = -2 * ABS(dx);

			for (int x = x0; x != x1 + incX; x += incX)
			{
				gfx.setPixel(x, y, c);
				error += slope;

				if (error >= 0)
				{
					y += incY;
					error += errorInc;
				}
			}
		}

		Download source code
		Download executable for Windows
Now it's easy to write all the cases. The vertical ones are just symetrical.
		#define ABS(_x) ((_x) >= 0 ? (_x) : -(_x))
		#define SGN(_x) ((_x) < 0 ? -1 : \
						 ((_x) > 0 ? 1 : 0))

		void drawLine(int x0, int y0, int x1, int y1, Color c)
		{
			int dx = x1 - x0;
			int dy = y1 - y0;
			int incX = SGN(dx);
			int incY = SGN(dy);
			dx = ABS(dx);
			dy = ABS(dy);

			if (dy == 0)
			{
				// horizontal line
				for (int x = x0; x != x1 + incX; x += incX)
					gfx.setPixel(x, y0, c);
			}
			else if (dx == 0)
			{
				// vertical line
				for (int y = y0; y != y1 + incY; y += incY)
					gfx.setPixel(x0, y, c);
			}
			else if (dx >= dy)
			{
				// more horizontal than vertical
				int slope = 2 * dy;
				int error = -dx;
				int errorInc = -2 * dx;
				int y = y0;

				for (int x = x0; x != x1 + incX; x += incX)
				{
					gfx.setPixel(x, y, c);
					error += slope;

					if (error >= 0)
					{
						y += incY;
						error += errorInc;
					}
				}
			}
			else
			{
				// more vertical than horizontal
				int slope = 2 * dx;
				int error = -dy;
				int errorInc = -2 * dy;
				int x = x0;

				for (int y = y0; y != y1 + incY; y += incY)
				{
					gfx.setPixel(x, y, c);
					error += slope;

					if (error >= 0)
					{
						x += incX;
						error += errorInc;
					}
				}
			}
		}

		Download source code
		Download executable for Windows
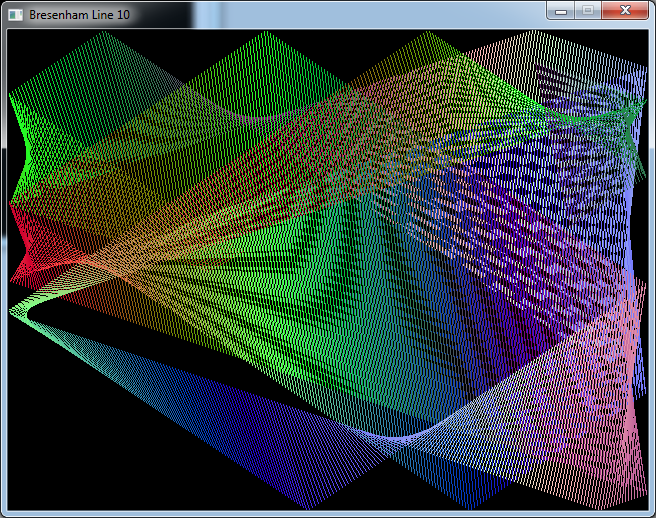
Finally, I put this line routine in Graphics and wrote a kind of screensaver to test the lines in any orientations.
		#include <stdio.h>
		#include <stdlib.h>
		#include <math.h>
		#include <time.h>
		#include "main.h"
		#include "Graphics.h"
		#include "System.h"

		#define SCREEN_WIDTH    640
		#define SCREEN_HEIGHT   480

		int main(int argc, char* argv[])
		{
			// init the window
			gfx.init("Bresenham Line 10", SCREEN_WIDTH, SCREEN_HEIGHT);
			gfx.init2D();
			gfx.clearScreen(Color(0, 0, 0, SDL_ALPHA_OPAQUE));

			srand(time(NULL));

			int x0 = rand() % SCREEN_WIDTH;
			int y0 = rand() % SCREEN_HEIGHT;
			int spdX0 = (rand() % 7) - 3;
			int spdY0 = (rand() % 7) - 3;

			int x1 = rand() % SCREEN_WIDTH;
			int y1 = rand() % SCREEN_HEIGHT;
			int spdX1 = (rand() % 7) - 3;
			int spdY1 = (rand() % 7) - 3;

			int r = rand() % 256;
			int g = rand() % 256;
			int b = rand() % 256;
			int spdR = (rand() % 7) - 3;
			int spdG = (rand() % 7) - 3;
			int spdB = (rand() % 7) - 3;

			while (sys.isQuitRequested() == false)
			{
				gfx.line(x0, y0, x1, y1, Color(r, g, b));

				x0 += spdX0;
				if (x0 < 0 || x0 >= SCREEN_WIDTH)
				{
					spdX0 = -spdX0;
					x0 += spdX0;
				}

				y0 += spdY0;
				if (y0 < 0 || y0 >= SCREEN_HEIGHT)
				{
					spdY0 = -spdY0;
					y0 += spdY0;
				}

				x1 += spdX1;
				if (x1 < 0 || x1 >= SCREEN_WIDTH)
				{
					spdX1 = -spdX1;
					x1 += spdX1;
				}

				y1 += spdY1;
				if (y1 < 0 || y1 >= SCREEN_HEIGHT)
				{
					spdY1 = -spdY1;
					y1 += spdY1;
				}

				r += spdR;
				if (r < 0 || r > 255)
				{
					spdR = -spdR;
					r += spdR;
				}

				g += spdG;
				if (g < 0 || g > 255)
				{
					spdG = -spdG;
					g += spdG;
				}

				b += spdB;
				if (b < 0 || b > 255)
				{
					spdB = -spdB;
					b += spdB;
				}

				gfx.render();
				sys.wait(10);
				sys.processEvents();
			}

			gfx.quit();

			return EXIT_SUCCESS;
		}

		Download source code
		Download executable for Windows