The code in this article was written using Code::Blocks and SDL 2.
You can read
here a guide to install this software.
Although it is based on SDL, I don't use its functions directly. I have written a small library with a few basic
functions to ease the understanding and the portability to another language.
You can read more about this lib
here.
In this article I use the vector class I first talked about
here.
Metaballs are an old time effect used in demos.
The idea is to display moving circles that seem to merge together as if they were liquid.
To achieve that we will need to colour each pixels depending on its distance from several points.
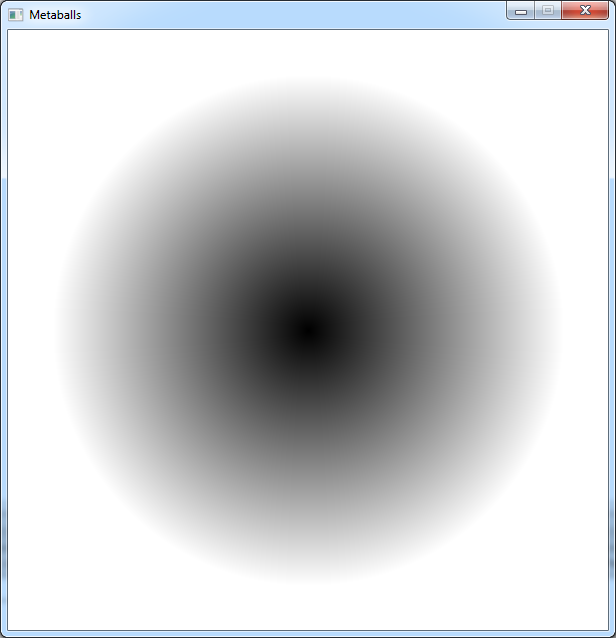
So let's start with a single point in the center of the screen.
We will use a vector to define its position:
Vec2f blobPos(SCREEN_WIDTH / 2, SCREEN_HEIGHT / 2);
Then we will loop over each pixel of the screen
		for (int y = 0; y < SCREEN_HEIGHT; y++)
			for (int x = 0; x < SCREEN_HEIGHT; x++)
			{
				Vec2f p(x, y);
And we will compute the distance of the pixel from our point.
				Vec2f delta = p - blobPos;
				float dist = delta.mag();
By limiting this value to 255, we can use it as a color to draw on the screen.
				if (dist > 255)
					dist = 255;

				int c = (int)dist;
				gfx.setPixel(x, y, Color(c, c, c));
			}

		Download source code
		Download executable for Windows
And this is what we get:
We will later display several of these "blobs" and they will have various sizes.
So let's add a radius to this point.
		Vec2f   blobPos(SCREEN_WIDTH / 2, SCREEN_HEIGHT / 2);
		float   blobRadius = 100.0f;
I want to invert the colors of what we see on the screen too. So I will substract the distance from this radius.
		float dist = blobRadius - delta.mag();

		if (dist < 0)
			dist = 0;

		if (dist > 255)
			dist = 255;

		Download source code
		Download executable for Windows
And now we can see that:
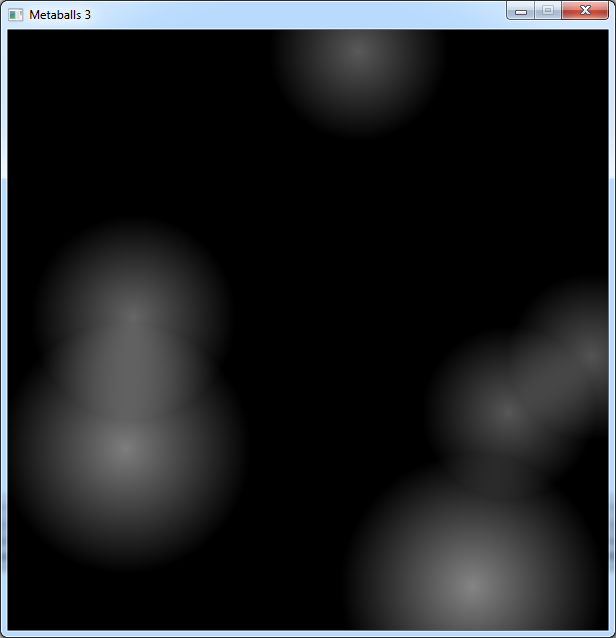
If we want to have several blobs, it will be easier to write a class for them.
So I declare it in "main.h":
		class CBlob
		{
		public:
			CBlob();

			Vec2f   pos;
			float   radius;
		};
The constructor of this class will put random values in the members:
		CBlob::CBlob()
		{
			pos.x = rand() % SCREEN_WIDTH;
			pos.y = rand() % SCREEN_HEIGHT;

			radius = 50 + (rand() % 100);
		}
At the beginning of the program we will allocate an array of these blobs.
		srand(time(NULL));

		const int nbBlobs = 6;
		CBlob* blobs = new CBlob[nbBlobs];
And in the main loop we will now need to add the distances from each blob.
		Vec2f p(x, y);

		float power = 0;

		for (int i = 0; i < nbBlobs; i++)
		{
			Vec2f delta = p - blobs[i].pos;
			float dist = blobs[i].radius - delta.mag();

			if (dist < 0)
				dist = 0;

			power += dist;
		}

		if (power > 255)
			power = 255;

		int c = (int)power;
		gfx.setPixel(x, y, Color(c, c, c));

		Download source code
		Download executable for Windows
And this is the result:
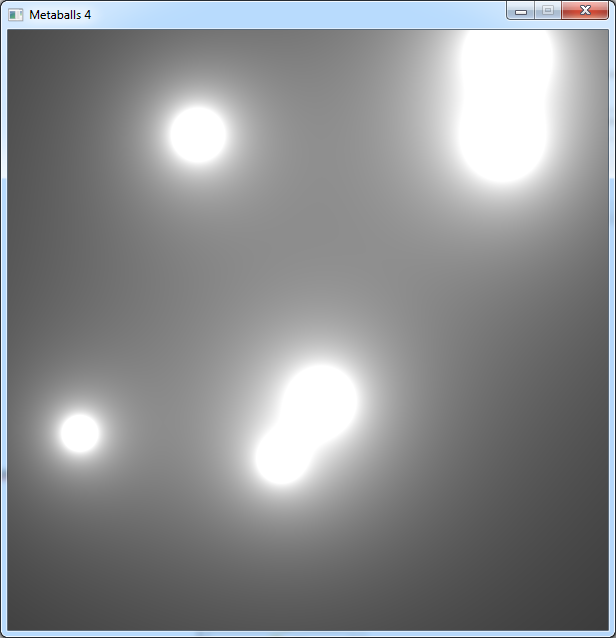
We didn't use the real metaballs formula yet.
In fact we don't have to substract the distance from the radius, but to divide it:
		for (int i = 0; i < nbBlobs; i++)
		{
			Vec2f delta = p - blobs[i].pos;
			power += blobs[i].radius / delta.mag();
		}
With this new formula, the blobs need bigger radiuses:
		radius = 2000 + (rand() % 6000);

		Download source code
		Download executable for Windows
And this is what we can get:
The metaball effect is much more impressive when the blobs are moving.
So we will add to them a velocity and an update() function to update their positions.
		class CBlob
		{
		public:
			CBlob();
			void update();

			Vec2f   pos;
			Vec2f   vel;
			float   radius;
		};
The velocity will be initialized randomly with values between -3 and 3:
		CBlob::CBlob()
		{
			[...]

			vel.x = ((rand() % 61) - 30) / 10.0f;
			vel.y = ((rand() % 61) - 30) / 10.0f;
In the update function we will add the velocity to the blob's position and check each side of the screen to make it
bounce.
		void CBlob::update()
		{
			pos += vel;

			if (pos.x < 0)
			{
				pos.x = 0;
				vel.x = -vel.x;
			}

			if (pos.x > SCREEN_WIDTH - 1)
			{
				pos.x = SCREEN_WIDTH - 1;
				vel.x = -vel.x;
			}

			if (pos.y < 0)
			{
				pos.y = 0;
				vel.y = -vel.y;
			}

			if (pos.y > SCREEN_HEIGHT - 1)
			{
				pos.y = SCREEN_HEIGHT - 1;
				vel.y = -vel.y;
			}
		}
Then in the main loop we will call this update function for each blob:
        for (int i = 0; i < nbBlobs; i++)
            blobs[i].update();

		Download source code
		Download executable for Windows
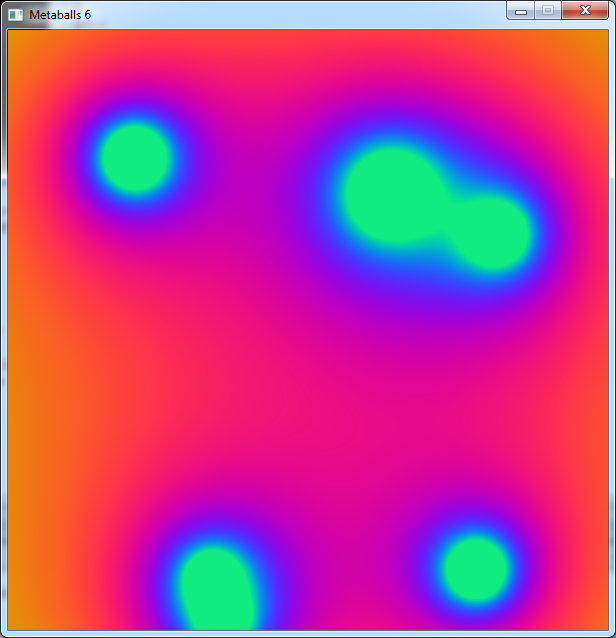
Now let's try to colour these balls with a simple formula I used for fractals:
		Color c;
		float angle = (power + 214) * M_PI / 128;
		c.r = 127 * (1 + sin(angle));
		c.g = 127 * (1 + sin(angle + 2 * M_PI / 3));
		c.b = 127 * (1 + sin(angle + 4 * M_PI / 3));

		gfx.setPixel(x, y, c);

		Download source code
		Download executable for Windows
The colors are nice:
But this program is very very slow.
So it's time to optimize.
Before we change any code. We will time how long the calculation take with the SDL timer functions I already used
in a previous article.
Right after the beginning of the main loop we will start the timer:
		while (sys.isQuitRequested() == false)
		{
			sys.StartPerfCounter();
And just after we updated the blobs and before rendering we stop it and print its value.
		for (int i = 0; i < nbBlobs; i++)
			blobs[i].update();

		float tim = sys.StopPerfCounter();
		printf("%f\n", tim);

		gfx.render();

		Download source code
		Download executable for Windows
On my computer with an i7-4770K it takes about 93 ms to compute a frame. That's very slow.
Speeding up with a palette
Obviously the sin() function is far too slow to be computed several times for each pixel.
To improve that we will precompute a 256 colors palette at the beginning of the program:
		static Color palette[256];
		for (int i = 0; i < 256; i++)
		{
			float angle = (i + 64 + 150) * M_PI / 128;
			palette[i].r = 127 * (1 + sin(angle));
			palette[i].g = 127 * (1 + sin(angle + 2 * M_PI / 3));
			palette[i].b = 127 * (1 + sin(angle + 4 * M_PI / 3));
		}
Then when we draw the pixel we only have to take the color in this palette.
		int c = (int)power;
		gfx.setPixel(x, y, palette[c]);

		Download source code
		Download executable for Windows
Now a frame with this code takes between 24 and 25 ms.
Getting rid of the square root
The mag() function that we use to get a distance uses a square root:
		float Vec2f::mag()
		{
			return sqrt(squaredMag());
		}
That's a very expensive function. But we can use the squaredMag() function instead which returns the squared
distance:
		float Vec2f::squaredMag()
		{
			return x * x + y * y;
		}
Now the distance calculation in the main loop will look like that:
		for (int i = 0; i < nbBlobs; i++)
		{
			Vec2f delta = p - blobs[i].pos;
			power += blobs[i].radius / delta.squaredMag();
		}
Of course using the squared distance changes radically the result of the calculation.
But hopefully we can compensate that by changing the function of the palette.
		static Color palette[256];
		for (int i = 0; i < 256; i++)
		{
			float angle = (pow(i, 0.64) + 78) * M_PI / 20;
And we will have to tune the radii of the blobs too:
		radius = 4000 + (rand() % 12000);
		radius *= 30;

		Download source code
		Download executable for Windows
It took me some time to find the right formula for the palette, but here is the result:
Visually the melting of 2 blobs is a bit less impressive, and we can see a little banding effect in the yellow area.
But all in all we get something very near of what we had with the previous program.
And this version of the code only takes 16 ms to compute a frame.
Getting rid of the floats
Now we can do something very common in optimisation: removing the floating point operations and using only integer
values.
First we will create a SVec structure to replace the floating point vectors.
We will use it for the position and the velocity of the blobs. And the radius will be an integer too.
		struct SVec
		{
			int x, y;
		};

		class CBlob
		{
		public:
			CBlob();
			void update();

			SVec    pos;
			SVec    vel;
			int     radius;
		};
The main problem when you turn everything to integers is to keep enough precision.
In particular when you have velocities. We want to be able to move the blobs at less than 1 pixel per frame.
So in the constructor I multiply both the position and the velocity by 256.
Multiplying or dividing by a power of 2 is very fast as the compiler can replace that by a bit shifting
instruction.
		CBlob::CBlob()
		{
			pos.x = (rand() % SCREEN_WIDTH) * 256;
			pos.y = (rand() % SCREEN_HEIGHT) * 256;

			vel.x = (((rand() % 61) - 30) * 256) / 20;
			vel.y = (((rand() % 61) - 30) * 256) / 20;

			radius = 4000 + (rand() % 12000);
			radius *= 30;
		}
We use the same multiplier in the update function when we test the position against the screen limits.
		void CBlob::update()
		{
			pos.x += vel.x;
			pos.y += vel.y;

			if (pos.x < 0)
			{
				pos.x = 0;
				vel.x = -vel.x;
			}

			if (pos.x > (SCREEN_WIDTH - 1) * 256)
			{
				pos.x = (SCREEN_WIDTH - 1) * 256;
				vel.x = -vel.x;
			}

			if (pos.y < 0)
			{
				pos.y = 0;
				vel.y = -vel.y;
			}

			if (pos.y > (SCREEN_HEIGHT - 1) * 256)
			{
				pos.y = (SCREEN_HEIGHT - 1) * 256;
				vel.y = -vel.y;
			}
		}
In the main loop the power will be an integer too.
We rewrite the distance calculation without using the Vec2f function.
Notice the trick to round the value of the blob's position while we divide it by 256.
		int power = 0;

		for (int i = 0; i < nbBlobs; i++)
		{
			int dX = x - (blobs[i].pos.x + 128) / 256;
			int dY = y - (blobs[i].pos.y + 128) / 256;
			int dist = dX * dX + dY * dY;
The floating point calculations handled the case of a division by zero. Now that we use integers we have to add a
test to avoid that.
			if (dist == 0)
				power = 255;
			else
				power += blobs[i].radius / dist;
		}

		if (power > 255)
			power = 255;
And now we don't need to cast power to an integer to be able to use it as a palette index.
		gfx.setPixel(x, y, palette[power]);

		Download source code
		Download executable for Windows
Now we see more banding and interferences in the yellow areas due to the loss of precision.
We could probably do better to keep precision through the operations.
But the code only need 10 ms per frame.
Getting rid of the blobs position calculation
We are getting to a point where even a simple addition and a division by a power of 2 starts to be important
compared to the other operations in the inner loop.
The small calculation that we do to the blobs position doesn't seem to be heavy, but let's try to get it out of the
loops that go through each pixel.
As the blobs are moving, we still need to do that in the main loop.
		while (sys.isQuitRequested() == false)
		{
			sys.StartPerfCounter();

			static int bX[nbBlobs];
			static int bY[nbBlobs];

			for (int i = 0; i < nbBlobs; i++)
			{
				bX[i] = (blobs[i].pos.x + 128) / 256;
				bY[i] = (blobs[i].pos.y + 128) / 256;
			}

			for (int y = 0; y < SCREEN_HEIGHT; y++)
			[...]
Then in the inner loop we can simply use the values of these arrays:
		int dX = x - bX[i];
		int dY = y - bY[i];
		int dist = dX * dX + dY * dY;

		Download source code
		Download executable for Windows
This code only needs 7.5 ms per frame. That's a quite interesting gain for such a simple operation.
Getting rid of the division
Like the square root, the division is a very expensive operation.
The one we use when we divide the radius by the distance is not easy to remove.
But we can try to replace it by a precomputed table.
That will take a bit of memory for each blob, but optimisation is often a trade-off between efficiency and memory
usage.
As we divide by a squared distance, it's a big value. So, to avoid the use a a big table, we will first divide
this value by 128.
We should not loose too much precision by doing that.
int dist = (dX * dX + dY * dY) / 128;
Then in the following lines we will replace the division by an array value.
I chose to use an array of 2048 values for each blob.
		if (dist == 0)
			power = 255;
		else if (dist < 2048)
			power += div[i][dist];
Now we only have to fill the values of these tables.
As they don't change we can do that outside of the main loop.
Notice that I divide the radius by the same 128 value as we used before.
		static int div[nbBlobs][2048];

		for (int i = 0; i < nbBlobs; i++)
			for (int j = 1; j < 2048; j++)
				div[i][j] = (blobs[i].radius / 128) / j;

		while (sys.isQuitRequested() == false)
		[...]

		Download source code
		Download executable for Windows
Visually, there is not much difference from the last picture we took.
But this code takes only 4 ms per frame.
In the inner loop we have to test for a division by 0
		if (dist == 0)
			power = 255;
But we can get rid of this test. If you noticed we began to fill the precomputed division table at 1, because we
would have a division by 0 in the precomputation.
But the array still have an element at index 0.
So we will simply store this test there.
		for (int i = 0; i < nbBlobs; i++)
		{
			div[i][0] = 255;

			for (int j = 1; j < 2048; j++)
			[...]
And in the inner loop we now just need one test:
		int dist = (dX * dX + dY * dY) / 128;

		if (dist < 2048)
			power += div[i][dist];

		Download source code
		Download executable for Windows
This code takes about 3.5 ms per frame.
Getting rid of the other if
If we want to remove the other "if" we need to make sure that the div array will be large enough to store all the
possible values.
Our screen resolution is 600*600. So the biggest value for "dX * dX + dY * dY" would be 600*600*2.
An array of 2048 elements seems a bit small. Let's go for 4096.
We will need to divide dist by at least 600*600*2 / 4096 = 175.
As before, it is better to divide by a power of 2, so we will use 256.
Our precomputing will look like this:
		static int div[nbBlobs][4096];

		for (int i = 0; i < nbBlobs; i++)
		{
			div[i][0] = 255;

			for (int j = 1; j < 4096; j++)
				div[i][j] = (blobs[i].radius / 256) / j;
		}
And the inner loop will look like this:
		for (int i = 0; i < nbBlobs; i++)
		{
			int dX = x - bX[i];
			int dY = y - bY[i];
			int dist = (dX * dX + dY * dY) / 256;
			power += div[i][dist];
		}

		Download source code
		Download executable for Windows
This version needs about 3.3 ms to compute a frame.
Bringing back the square root
At this point we can't really go further witout using assembly language.
But as we externalized nearly all the calulations, we can bring back the square root in the precomputed division
array.
We will even reuse floats for this array and the power variable
		for (int j = 1; j < 4096; j++)
			div[i][j] = (float)blobs[i].radius / sqrt(j * 256);
Our pixel loop will now be:
		float power = 0;

		for (int i = 0; i < nbBlobs; i++)
		{
			int dX = x - bX[i];
			int dY = y - bY[i];
			int dist = (dX * dX + dY * dY) / 256;
			power += div[i][dist];
		}

		int p = int(power);
		if (p > 255)
			p = 255;

		gfx.setPixel(x, y, palette[p]);
We also need to use the original palette:
float angle = (i + 64 + 150) * M_PI / 128;
And the original radiuses:
		radius = 2000 + (rand() % 6000);

		Download source code
		Download executable for Windows
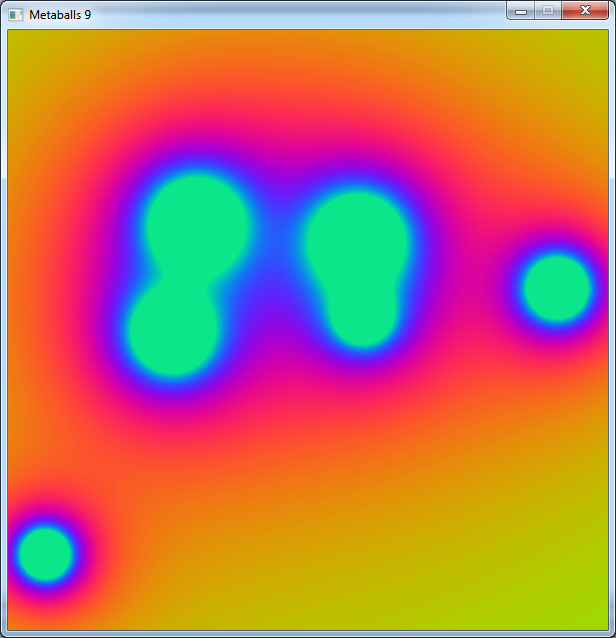
Now this version takes about 4.2 ms per frame, but the result is far more impressive:
You will notice a little banding on the smaller blobs. That comes from the pre-division of dist by 256 before using
the div table.
Anyways I hope you liked this optimisation session.


 Video: Metaballs in Processing