The code in this article was written using Code::Blocks and SDL 2.
You can read
here a guide to install this sofware.
Although it is based on SDL, I don't use its functions directly. I have written a small library with a few basic
functions to ease the understanding and the portability to another language.
You can read more about this lib
here.
The code in this article uses the Bresenham's line algorithm we talked about
here.
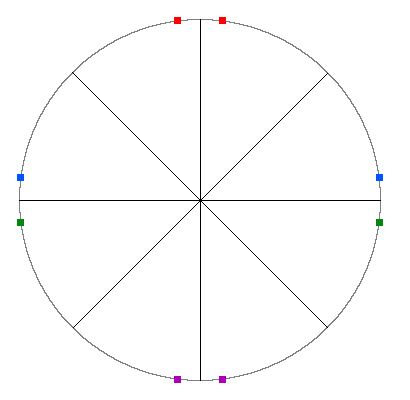
In the last article we saw the Bresenham's circle algorithm.
In this algorithm we did a loop where we increased x, and inside this loop we drew 8 points symmetrically.
To fill this circle we will draw a line between each pair of points that are symmetrical with respect to the Y axis.
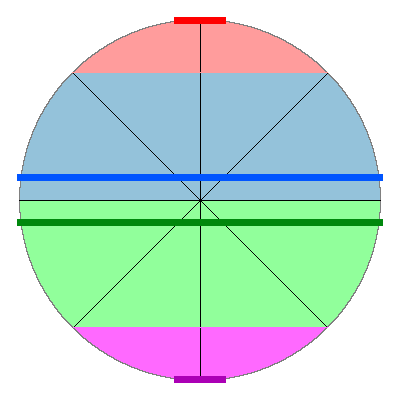
They will fill the areas shown on this image:
We will use the line function to draw this:
		void circle(int centerX, int centerY, int radius, Color c)
		{
			int x = 0;
			int y = radius;
			int m = 5 - 4 * radius;

			while (x <= y)
			{
				gfx.line(centerX - x, centerY - y, centerX + x, centerY - y, c);
				gfx.line(centerX - y, centerY - x, centerX + y, centerY - x, c);
				gfx.line(centerX - y, centerY + x, centerX + y, centerY + x, c);
				gfx.line(centerX - x, centerY + y, centerX + x, centerY + y, c);

				if (m > 0)
				{
					y--;
					m -= 8 * y;
				}

				x++;
				m += 8 * x + 4;
			}
		}
And as in the previous article, we will time the drawing of 10000 circles:
		// time 10000 circles
		sys.StartPerfCounter();

		for (int i = 0; i < 10000; i++)
			circle(SCREEN_WIDTH  / 2, SCREEN_HEIGHT / 2, 150, Color(255, 255, 255));

		printf("%f\n", sys.StopPerfCounter());

		Download source code
		Download executable for Windows
This code takes about 480 ms on my computer.
At each loop step, x is increased.
If you look at the blue and the green areas of the circle they correspond to the line functions that uses x for the
y coordinates.
So a line is drawn at each step.
But for the top and the bottom areas, we use x for the x coordinate and y for the y coordinate.
But y is not decreased at each iteration. So we are drawing several times a line at the same y coordinate.
To improve that, we will move 2 of the line functions in the test where y is decreased:
		while (x <= y)
		{
			gfx.line(centerX - y, centerY - x, centerX + y, centerY - x, c);
			gfx.line(centerX - y, centerY + x, centerX + y, centerY + x, c);

			if (m > 0)
			{
				gfx.line(centerX - x, centerY - y, centerX + x, centerY - y, c);
				gfx.line(centerX - x, centerY + y, centerX + x, centerY + y, c);
				y--;
				m -= 8 * y;
			}

			x++;
			m += 8 * x + 4;
		}

		Download source code
		Download executable for Windows
This code takes about 435 ms.
The line function uses the Bresenham algorithm that is meant to draw lines in any direction.
It is not particularly optimized for horizontal lines.
We should better use the rectFill function that has a more compact code.
We will simply draw rectangles of 1 pixel of height.
		while (x <= y)
		{
			gfx.rectFill(centerX - y, centerY - x, centerX + y + 1, centerY - x + 1, c);
			gfx.rectFill(centerX - y, centerY + x, centerX + y + 1, centerY + x + 1, c);

			if (m > 0)
			{
				gfx.rectFill(centerX - x, centerY - y, centerX + x + 1, centerY - y + 1, c);
				gfx.rectFill(centerX - x, centerY + y, centerX + x + 1, centerY + y + 1, c);
				y--;
				m -= 8 * y;
			}

		Download source code
		Download executable for Windows
This code is a little bit faster. It takes about 410 ms.
The rectFill function uses 2 nested loops.
Even if the y loop is only executed 1 time, that adds a few useless instructions.
So why don't we write a single loop instead ?
		while (x <= y)
		{
			for (int xx = centerX - y; xx <= centerX + y; xx++)
				gfx.setPixel(xx, centerY - x, c);

			for (int xx = centerX - y; xx <= centerX + y; xx++)
				gfx.setPixel(xx, centerY + x, c);

			if (m > 0)
			{
				for (int xx = centerX - x; xx <= centerX + x; xx++)
					gfx.setPixel(xx, centerY - y, c);

				for (int xx = centerX - x; xx <= centerX + x; xx++)
					gfx.setPixel(xx, centerY + y, c);

				y--;
				m -= 8 * y;
			}

		Download source code
		Download executable for Windows
Again, this is a little bit faster. This version runs in about 400 ms.
In the previous program we use 2 successive for loops with the same parameters.
Let's try to merge them:
		while (x <= y)
		{
			for (int xx = centerX - y; xx <= centerX + y; xx++)
			{
				gfx.setPixel(xx, centerY - x, c);
				gfx.setPixel(xx, centerY + x, c);
			}

			if (m > 0)
			{
				for (int xx = centerX - x; xx <= centerX + x; xx++)
				{
					gfx.setPixel(xx, centerY - y, c);
					gfx.setPixel(xx, centerY + y, c);
				}

				y--;
				m -= 8 * y;
			}

		Download source code
		Download executable for Windows
This version takes between 360 and 370 ms.
The pixelPos2D function uses a multiplication, but as we are drawing horizontal lines the pixels are at successive
positions in the screen array.
So we only need an increment instead of an expensive multiplication for each pixel.
We will use a new setPixel function that takes the index of the pixel instead of its coordinates:
		inline void setPixel(int pos, Color c)
		{
			mPixels2D[pos] = c;
		}
And our drawing loop will now become:
		while (x <= y)
		{
			int pos1 = gfx.pixelPos2D(centerX - y, centerY - x);
			int pos2 = gfx.pixelPos2D(centerX - y, centerY + x);

			for (int xx = centerX - y; xx <= centerX + y; xx++)
			{
				gfx.setPixel(pos1++, c);
				gfx.setPixel(pos2++, c);
			}

			if (m > 0)
			{
				int pos1 = gfx.pixelPos2D(centerX - x, centerY - y);
				int pos2 = gfx.pixelPos2D(centerX - x, centerY + y);

				for (int xx = centerX - x; xx <= centerX + x; xx++)
				{
					gfx.setPixel(pos1++, c);
					gfx.setPixel(pos2++, c);
				}

				y--;
				m -= 8 * y;
			}

		Download source code
		Download executable for Windows
This version is just a little bit faster, taking between 350 and 360 ms.
We are getting to a level where it is important to take into account the way the data cache of the CPU works.
Now, drawing 2 separate pixels in the same loop is less efficient because they are not in the same cache line.
So we will split the for loops we merged before...
		while (x <= y)
		{
			int pos = gfx.pixelPos2D(centerX - y, centerY - x);
			for (int xx = centerX - y; xx <= centerX + y; xx++)
				gfx.setPixel(pos++, c);

			pos = gfx.pixelPos2D(centerX - y, centerY + x);
			for (int xx = centerX - y; xx <= centerX + y; xx++)
				gfx.setPixel(pos++, c);

			if (m > 0)
			{
				pos = gfx.pixelPos2D(centerX - x, centerY - y);
				for (int xx = centerX - x; xx <= centerX + x; xx++)
					gfx.setPixel(pos++, c);

				pos = gfx.pixelPos2D(centerX - x, centerY + y);
				for (int xx = centerX - x; xx <= centerX + x; xx++)
					gfx.setPixel(pos++, c);

				y--;
				m -= 8 * y;
			}

		Download source code
		Download executable for Windows
This code takes around 285 ms.
We can still optimize little bit by avoiding the indirection of using an index to the pixels table.
Now we will use pointers to these pixels.
In the next code, I put mPixels2D as public in Graphics.h and our drawing loop now looks like that:
		while (x <= y)
		{
			Color* ptr = &gfx.mPixels2D[gfx.pixelPos2D(centerX - y, centerY - x)];
			for (int xx = centerX - y; xx <= centerX + y; xx++)
				*ptr++ = c;

			ptr = &gfx.mPixels2D[gfx.pixelPos2D(centerX - y, centerY + x)];
			for (int xx = centerX - y; xx <= centerX + y; xx++)
				*ptr++ = c;

			if (m > 0)
			{
				ptr = &gfx.mPixels2D[gfx.pixelPos2D(centerX - x, centerY - y)];
				for (int xx = centerX - x; xx <= centerX + x; xx++)
					*ptr++ = c;

				ptr = &gfx.mPixels2D[gfx.pixelPos2D(centerX - x, centerY + y)];
				for (int xx = centerX - x; xx <= centerX + x; xx++)
					*ptr++ = c;

				y--;
				m -= 8 * y;
			}

		Download source code
		Download executable for Windows
This final version takes around 240 ms, 2 times faster than the first one.
As I'm not very happy to let mPixels2D as public, I will include this function in Graphics.cpp for the future
versions of my lib.